Packages we will need:
library(tidyverse)
library(psych)
library(ggcorrplot)
library(lavaan)
library(gt)
library(gtExtras)
library(skimr)
How do people view the state of the economy in the past, present and future for the country and how they view their own economic situation?
Are they highly related concepts? In fact, are all these questions essentially asking about one thing: how optimistic or pessimistic a person is about the economy?
In this blog we will look at different ways to examine whether the questions answered in a survey are similiar to each other and whether they are capturing an underlying construct or operationalising a broader concept.
In our case, the underlying concept relates to levels of optimism about the economy.
We will use Afrobarometer survey responses in this blog post.
Click here to follow links to download Afrobarometer data and to recode the country variables.
First, we can make a mini data.frame to look at only the variables that ask the respondents to describe how they think:
- the state of the economy is now (state_econ_now),
- their own economic condition is now (my_econ_now),
- the economy was a year ago (state_econ_past),
- the economy will be in a year (state_econ_future)
In the data, variables range from:
1 = Very bad, 2 = Fairly bad, 3 = Neither good nor bad, 4 = Fairly good, 5 = Very good.
or in the variables comparing the past and the future:
1 = Much worse, 2 = Worse, 3 = Same, 4 = Better, 5 = Much better
The variables we want to remove:
8 = Refused, 9 = Don’t know, -1 = Missing
ab %>%
  select(country_name,
         state_econ_now = Q4A,
         my_econ_now = Q4B,
         state_econ_past = Q6A,
         state_econ_future = Q6B)  %>%
  filter(across(where(is.numeric), ~ . <= 7)) -> ab_econ
With the skim() package and gt() package we can look at some descriptive statistics.
Click here to read more about the gtExtras() theme options:
ab_econ %>%
  select(!country_name) %>%
  skimr::skim(.) %>%
  mutate(across(where(is.numeric), ~ round(., 2))) %>%
  rename_with(~ sub("numeric\\.|skim_", "", .), everything()) %>%
  gt::gt() %>%
gtExtras::gt_theme_nytimes() %>% gt::as_raw_html()| type | variable | n_missing | complete_rate | mean | sd | p0 | p25 | p50 | p75 | p100 | hist |
|---|---|---|---|---|---|---|---|---|---|---|---|
| numeric | state_econ_now | 0 | 1 | 2.41 | 1.32 | 1 | 1 | 2 | 4 | 5 | ▇▆▃▅▂ |
| numeric | my_econ_now | 0 | 1 | 2.68 | 1.28 | 1 | 2 | 3 | 4 | 5 | ▇▇▅▇▂ |
| numeric | state_econ_past | 0 | 1 | 2.51 | 1.15 | 1 | 2 | 2 | 3 | 5 | ▆▇▆▅▁ |
| numeric | state_econ_future | 0 | 1 | 3.18 | 1.29 | 1 | 2 | 4 | 4 | 5 | ▃▃▃▇▃ |
First off, we can run a Chronbach’s alpha to examine whether these variables are capturing an underlying construct.
Do survey respondents have an overall positive or overall negative view of the economy (past, present and future) and is it related to respondents’ views of their own economic condition?
The Cronbach’s alpha statistic is a measure of internal consistency reliability for a number of questions in a survey.
Chronbach’s alpha assesses how well the questions in the survey are correlated with each other.
We can interpret the test output and examine the extent to which they measure the same underlying construct – namely the view that people are more optimistic about the economy or not.
ab_econ %>%
  select(!country_name) %>%
psych::alpha() -> cronbach_results| raw_alpha | std.alpha | G6(smc) | Avg_r | S/N | ase | mean | sd | median_r |
|---|---|---|---|---|---|---|---|---|
| 0.66 | 0.66 | 0.62 | 0.33 | 2 | 0.0026 | 2.7 | 0.89 | 0.32 |
When we interpret the output, the main one is the Raw Alpha score.
raw_alpha:
The raw Cronbach’s alpha coefficient ranges from 0 to 1.
For us, the Chronbach’s Alpha is 0.66. Higher values indicate greater internal consistency among the items. So, our score is a bit crappy.

std.alpha:
Standardized Cronbach’s alpha, which adjusts the raw alpha based on the number of items and their intercorrelations. It is also 0.66 because we only have a handful of variables
G6(smc):
The Guttman’s Lambda 6 is alternative estimate of internal consistency that we can consider. For our economic construct, it is 0.62.
Click this link if you want to go into more detail to discuss the differences between the alpha and the Guttman’s Lambda.
For example, they argue that Guttman’s Lambda is sensitive to the factor structure of a test. It is influenced by the degree of “lumpiness” or correlation among the test items.
For tests with a high degree of intercorrelation among items, G6 can be greater than Cronbach’s Alpha (α), which is a more common measure of reliability. In contrast, for tests with items that have very low intercorrelation, G6 can be lower than α
average_r:
The average inter-item correlation, which shows the average correlation between each item and all other items in the scale.
For us, the correation is 0.33. Again, not great. We can examine the individual correlations later.
S/N:
The Signal-to-Noise ratio, which is a measure of the signal (true score variance) relative to the noise (error variance). A higher value indicates better reliability.
For us, it is 2. This is helpful when we are comparing to different permutations of variables.
ase:
The standard error of measurement, which provides an estimate of the error associated with the test scores. A lower score indicates better reliability.
In our case, it is 0.0026. Again, we can compare with different sets of variables if we add or take away questions from the survey.
mean:
The mean score on the scale is 2.7. This means that out of a possible score of 5 across all the questions on the economy, a respondent usually answers on average in the middle (near to the answer that the economy stays the same)
sd:
The standard deviation is 0.89.
median_r:
The median inter-item correlation between the median item and all other items in the economic optimism scale is 0.32.
Looking at the above eight scores, the most important is the Cronbach’s alpha of 0.66 . This only suggests a moderate level of internal consistency reliability for our four questions.
But there is still room for improvement in terms of internal consistency.
| lower | alpha | upper | |
|---|---|---|---|
| Feldt | 0.66 | 0.66 | 0.67 |
| Duhachek | 0.66 | 0.66 | 0.67 |
Next we will look to see if we can improve the score and increase the Chronbach’s alpha.
Reliability if an item is dropped:
| raw_alpha | std.alpha | G6(smc) | Avg_r | S/N | alpha se | var.r | med.r | |
|---|---|---|---|---|---|---|---|---|
| Econ now | 0.52 | 0.53 | 0.43 | 0.27 | 1.1 | 0.004 | 0.004 | 0.26 |
| My econ | 0.59 | 0.59 | 0.49 | 0.33 | 1.5 | 0.003 | 0.001 | 0.34 |
| Econ past | 0.61 | 0.61 | 0.53 | 0.34 | 1.5 | 0.003 | 0.025 | 0.29 |
| Future | 0.65 | 0.64 | 0.57 | 0.38 | 1.8 | 0.003 | 0.017 | 0.35 |
Again, we can focus on the raw Chronbach’s alpha score in the first column if that given variable is removed.
We see that if we cut out any one of the the questions, the score goes down.
We don’t want that, because that would decrease the internal consistency of our underlying “optimism about the economy” type construct.
| Item | n | raw.r | std.r | r.cor | r.drop | mean | sd |
|---|---|---|---|---|---|---|---|
| Now | 43,702 | 0.77 | 0.76 | 0.67 | 0.54 | 2.4 | 1.3 |
| My econ | 43,702 | 0.71 | 0.71 | 0.57 | 0.45 | 2.7 | 1.3 |
| Past | 43,702 | 0.67 | 0.69 | 0.52 | 0.43 | 2.5 | 1.1 |
| Future | 43,702 | 0.66 | 0.65 | 0.45 | 0.36 | 3.2 | 1.3 |
These item statistics provide insights into the characteristics of each individual variable
We will look at the first variable in more detail.
state_econ_now
raw.r: The raw correlation between this item and the total score is 0.77, indicating a strong positive relationship with the overall score.std.r: The standardized correlation is 0.76, showing that this item contributes significantly to the total score’s variance.r.cor: This is the corrected item-total correlation and is 0.67, suggesting that the item correlates well with the overall construct even after removing it from the total score.r.drop: The corrected item-total correlation when the item is dropped is 0.54, indicating that the item still has a reasonable correlation even when not included in the total score.mean: The average response for this item is 2.4.sd: The standard deviation of responses for this item is 1.3.
| Item | 1 | 2 | 3 | 4 | 5 | miss |
|---|---|---|---|---|---|---|
| state_econ_now | 0.33 | 0.27 | 0.12 | 0.22 | 0.07 | 0 |
| my_econ_now | 0.23 | 0.26 | 0.17 | 0.27 | 0.06 | 0 |
| state_econ_past | 0.22 | 0.32 | 0.21 | 0.21 | 0.03 | 0 |
| state_econ_future | 0.15 | 0.17 | 0.16 | 0.39 | 0.13 | 0 |
Next we will lok at factor analysis.
Factor analysis can be divided into two main types:
- exploratory
- confirmatory
Exploratory factor analysis (EFA) is good when we want to check out initial psychometric properties of an unknown scale.
Confirmatory factor analysis borrows many of the same concepts from exploratory factor analysis.
However, instead of letting the data tell us the factor structure, we choose the factor structure beforehand and verify the psychometric structure of a previously developed scale.
For us, we are just exploring whether there is an underlying “optimism” about the economy or not.
For the EFA, we will run as Structural Equation Model with the sem() function from the lavaan package
efa_model <- sem(model, data = ab_econ, fixed.x = FALSE)When we set fixed.x = FALSE, as in your example, it means we are estimating the factor loadings as part of the EFA model.
With fixed.x = FALSE, the factor loadings are allowed to vary freely and are estimated based on the data
This is typical in an exploratory factor analysis, where we are trying to understand the underlying structure of the data, and we let the factor loadings be determined by the analysis.
Next let’s look at a summary of the EFA model:
summary(efa_model, standardized = TRUE)| lavaan 0.6.16 ended normally after 33 iterations |
|---|
| Estimator: ML |
| Optimization method: NLMINB |
| Number of model parameters: 9 |
| Number of observations: 43,702 |
| Model Test User Model: |
| Test statistic: 0.015 |
| Degrees of freedom: 1 |
| P-value (Chi-square): 0.903 |
| Parameter Estimates: |
| Standard errors: Standard |
| Information: Expected |
| Information saturated (h1) model: Structured |
Time for interpreting the output.
Model Test (Chi-Square Test):
- When we look at this, we evaluate the goodness of fit of the model.
- In this case, the test statistic is 0.015, the degrees of freedom is 1, and the p-value is 0.903.
- The high p-value (close to 1) suggests that the model fits the data well. Yay! (A non-significant p-value is generally a good sign for model fit).
Parameter Estimates:
- The output provides parameter estimates for the latent variables and covariances between them.
- The standardized factor loadings (Std.lv) and standardized factor loadings (Std.all) indicate how strongly each observed variable is associated with the latent factors.
- For example, “state_econ_now” has a strong loading on “f1” with Std.lv = 1.098 and Std.all = 0.833.
- Similarly, “state_econ_pst” and “state_econ_ftr” load on “f2” with different factor loadings.
Covariances:
- The covariance between the two latent factors, “f1” and “f2,” is estimated as 0.529. This implies a relationship between the two factors.
Variances:
- The estimated variances for the observed variables and latent factors. These variances help explain the amount of variability in each variable or factor.
- For example, “state_econ_now” has a variance estimate of 0.530.
Factor Loadings:
High factor loadings (close to 1) suggest that the variables are capturing the same construct.
For our output, we can say that factor loadings of “state_econ_now” and “my_econ_now” on “f1” are relatively high, which indicates that these variables share a common underlying construct. This captures how the respondent thinks about the current economy
Similarly, “state_econ_past” and “state_econ_future” load highly on “f2.”
This means that comparing to different times is a different variable of interest.
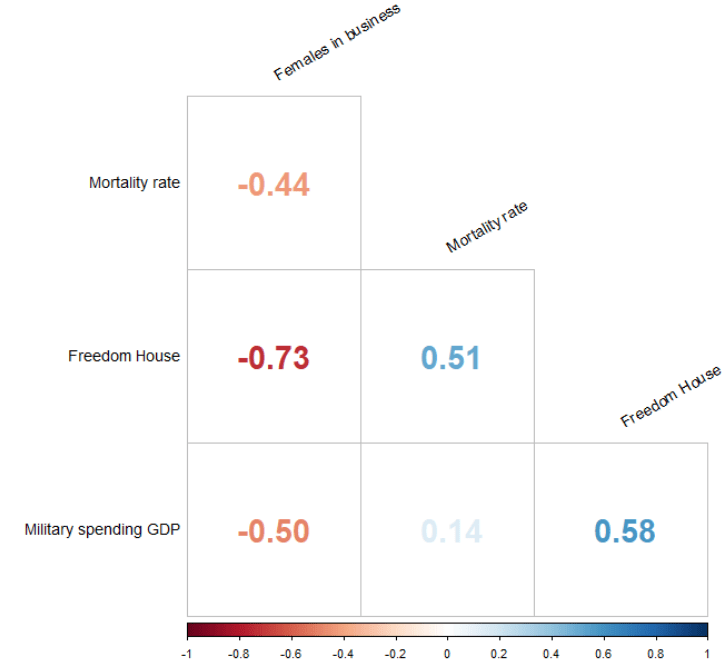
Finally, we can run correlations to visualise the different variables:
ab %>%
  select(country_name,
         state_econ_now = Q4A,
         my_econ_now = Q4B,
         state_econ_past = Q6A,
         state_econ_future = Q6B)  %>%
  filter(across(where(is.numeric), ~ . <= 7)) -> ab_econ

cor_matrix <- ab_econ %>%
  select(!country_name) %>%
  cor(., method = "spearman") %>%
  ggcorrplot(, type = "lower", lab = TRUE) +
  theme_minimal() +
  labs(x = " ", y = " ")
We can breakdown the correlations in each country to see if they differ.
We will pull out a vector of country that we can use to iterate over in our for loop below.
country_vector <- ab_econ %>%
  distinct(country_name) %>% pull()
Adter, we create an empty list to store our correlation matrices
correlation_matrices <- list()Then we iterate over the countries in the country_vector and create correlation matrices
for (country in country_vector) {
    country_data <- ab_mini %>%
    filter(country_name == country)
    cor_matrix <- country_data %>%
    select(-country_name) %>%
    cor(method = "spearman")
    round(., 2)
    correlation_matrices[[country]] <- cor_matrix
}
Last we print out the correlation between the “state of the economy now” and “my economic condition now” variables for each of the 34 countries
 correlation_matrix_list <- list()
  for (country in country_vector) {
   correlation_matrix_list[[country]] <- correlation_matrices[[country]][2]}

 correlation_matrix_df %>%
   t %>%
  as.data.frame() %>%
  rownames_to_column(var = "country") %>%
  select(country, corr = V1) %>%
  arrange(desc(corr)) -> state_econ_my_econ_corr
Let’s look at the different levels of correlation between the respondents’ answers to how the COUNTRY’S economic situation is doing and how the respondent thinks THEIR OWN economic situation.
state_econ_my_econ_corr %>%
   gt() %>%
gtExtras::gt_theme_nytimes() %>% gt::as_raw_html()| country | corr |
|---|---|
| Nigeria | 0.7316334 |
| Ghana | 0.6650589 |
| Morocco | 0.6089823 |
| Togo | 0.6079971 |
| Guinea | 0.6047750 |
| Ethiopia | 0.5851686 |
| Lesotho | 0.5787015 |
| Sierra Leone | 0.5684559 |
| Zimbabwe | 0.5666740 |
| Malawi | 0.5610069 |
| Angola | 0.5551344 |
| Niger | 0.5234742 |
| Uganda | 0.5182954 |
| Mauritius | 0.4950726 |
| Gambia | 0.4904879 |
| Liberia | 0.4878153 |
| Benin | 0.4871915 |
| Kenya | 0.4821280 |
| Côte d’Ivoire | 0.4800034 |
| Tanzania | 0.4787999 |
| Burkina Faso | 0.4749373 |
| Zambia | 0.4460212 |
| Mali | 0.4264943 |
| Cameroon | 0.4239547 |
| Sudan | 0.4005615 |
| Namibia | 0.3981573 |
| Senegal | 0.3902534 |
| South Africa | 0.3342683 |
| Botswana | 0.3146411 |
| Tunisia | 0.3109102 |
| Cabo Verde | 0.2881491 |
| Mozambique | 0.2793023 |
| Gabon | 0.2771796 |
| Eswatini | 0.2724921 |
Thank you for reading!