Graphing female politicians in Irish parliament with R PART 2: Trends and Maps

Packages we will need

library(tidyverse)
library(magrittr)
library(waffle)
library(geojsonio)
library(sf)

In PART 1, we looked at the gender package to help count the number of women in the 33rd Irish Parliament.

I repeated that for every session since 1921. The first and second Dail are special in Ireland as they are technically pre-partition.

Cleaned up the data aaaand now we have a full dataset with constituencies data.

If anyone wants a copy of the dataset, I can upload it here for those who are curious ~

So first… a simple pie chart!

First we calculate proportion of seats held by women

dail %>% 
  mutate(decade = substr(year, 1, 3)) %>% 
  mutate(decade = paste0(decade, "0s")) %>%
  group_by(decade) %>% 
  ungroup() %>% 
  group_by(decade, gender) %>% 
  count() %>% 
  group_by(decade) %>% 
  mutate(proportion = n / sum(n)) -> dail_pie
# A tibble: 22 × 4
# Groups:   decade [11]
   decade gender     n proportion
   <chr>  <chr>  <int>      <dbl>
 1 1920s  female    20     0.0261
 2 1920s  male     747     0.974 
 3 1930s  female    10     0.0172
 4 1930s  male     572     0.983 
 5 1940s  female    12     0.0284
 6 1940s  male     411     0.972 
 7 1950s  female    16     0.0363
 8 1950s  male     425     0.964 
 9 1960s  female    11     0.0255
10 1960s  male     421     0.975 
# 12 more rows

We will be looking at how proportions changed over the decades.

When using facet_wrap() with coord_polar(), it’s a pain in the arse.

This is because coord_polar() does not automatically allow each facet to have a different scale. Instead, coord_polar() treats all facets as having the same axis limits.

This will mess everything up.

If we don’t change the coord_polar(), we will just distort pie charts when the facet groups have different total values. There will be weird gaps and make some phantom pacman non-charts.

function() TRUE is an anonymous function that always returns TRUE.

my_coord_polar$is_free <- function() TRUE forces coord_polar() to allow different scales for each facet.

In our case, we call my_coord_polar$is_free, which means that whenever ggplot2 checks whether the coordinate system allows free scales across facets, it will now always return TRUE!!!

Overriding is_free() to always return TRUE signals to ggplot2 that coord_polar() means that our pie charts NOOWW will respect the "free" scaling specified in facet_wrap(scales = "free").

my_coord_polar <- coord_polar(theta = "y")
my_coord_polar$is_free <- function() TRUE

If you want to look more at this, check out this blog:

And we can go and create the ggplot:

dail_pie %>%
  ggplot(aes(x = "", 
         y = proportion, 
         fill = as.factor(gender))) +

  geom_bar(stat="identity", width = 1) +
  
  geom_text(
    data = . %>% filter(gender == "female"), aes(label = scales::percent(proportion, 
    accuracy = 0.1)), 
    color = "white",
    size = 8) +
  
  my_coord_polar +

  facet_wrap(~decade, scales = "free") + 
  scale_fill_manual(values =c("#bc4749", "#003049")) +
  # my_style() +
  theme(axis.text.x = element_blank(),
        panel.grid.major = element_blank(),
        panel.grid.minor = element_blank(),
        panel.grid = element_blank(), 
        panel.background = element_blank(), 
        axis.text = element_blank(), 
        axis.ticks = element_blank()) 

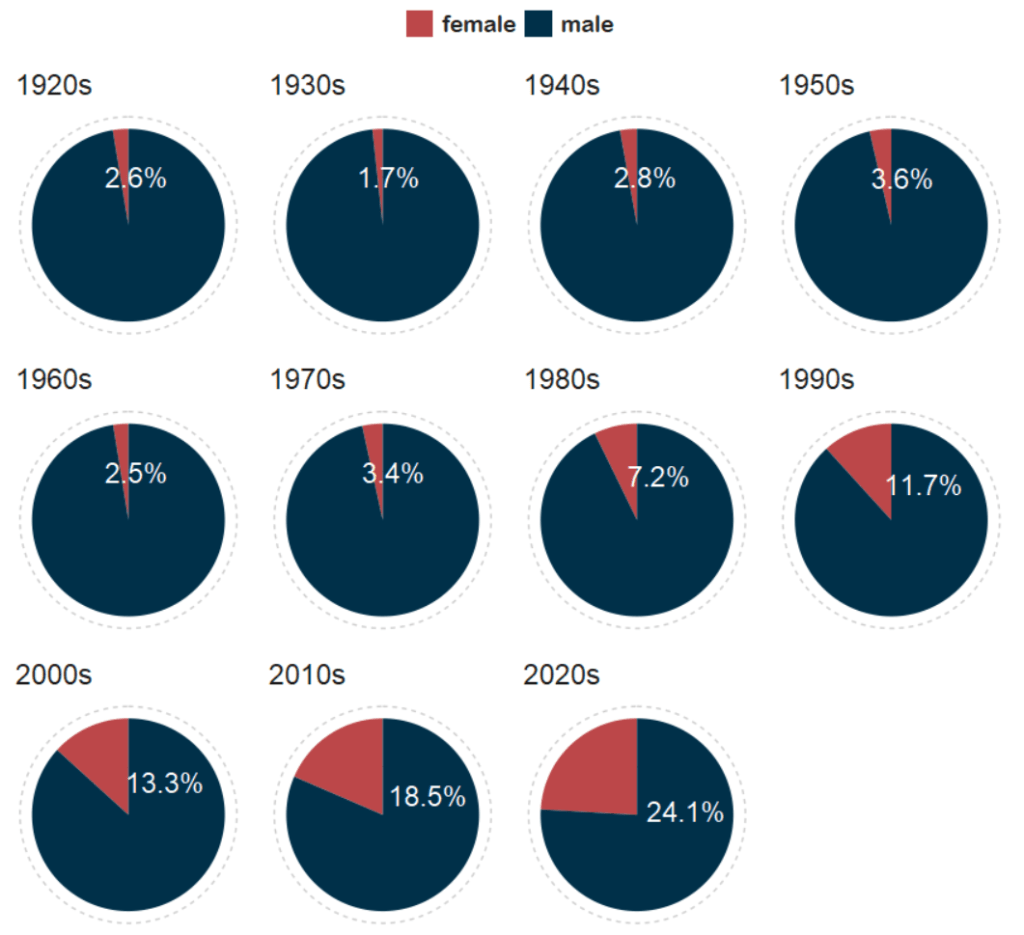
And with Canva, I add the arrows and titles~

Sorry I couldn’t figure it out in R. I just hate all the times I need to re-run graphics to move a text or number by a nano-centimeter. Websites like Canva are just far better for my sanity and short attention span.

Next, we can make a facetted waffle plot!

dail %>% 
  group_by(decade) %>% 
  ungroup() %>% 
  group_by(decade, gender) %>% 
  count() %>% 
  ggplot(aes(fill = as.factor(gender), values = n)) +
  waffle::geom_waffle(color = "white", 
                      size = 0.5, 
                      n_rows = 10, 
                      flip = TRUE) +
  facet_wrap(~decade, nrow = 1, strip.position = "bottom") +
# my_style  +
  scale_fill_manual(values =c("#003049", "#bc4749")) +
  theme(axis.text.x.bottom = element_blank(),
        text = element_text(size = 40))

And mea culpa, I finished the annotation and titles are with Canva.

Once again, life is too short to be messing with annotation in ggplot.

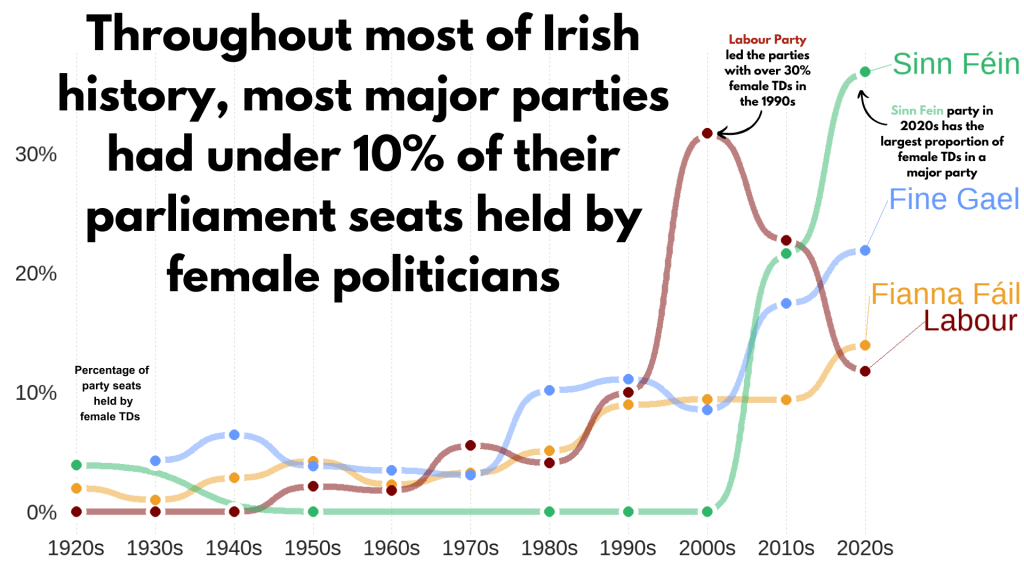
Next, we can make a simple trend line of the top Irish parties and see how they have fared with women TDs.

Let’s get a dataframe with average number of TDs elected to each party over the decades

dail %>% 
  filter(constituency != "National University") %>% 
  filter(party %in% c("Fianna Fáil", "Fine Gael", "Labour", "Sinn Féin")) %>% 
  group_by(party, decade) %>% 
  summarise(avg_female = mean(gender == "female")) -> dail_avg
# A tibble: 39 × 3
# Groups:   party [4]
   party       decade avg_female
   <chr>       <chr>       <dbl>
 1 Fianna Fáil 1920s     0.0198 
 2 Fianna Fáil 1930s     0.00685
 3 Fianna Fáil 1940s     0.0284 
 4 Fianna Fáil 1950s     0.0425 
 5 Fianna Fáil 1960s     0.0230 
 6 Fianna Fáil 1970s     0.0327 
 7 Fianna Fáil 1980s     0.0510 
 8 Fianna Fáil 1990s     0.0897 
 9 Fianna Fáil 2000s     0.0943 
10 Fianna Fáil 2010s     0.0938 
# 29 more rows

We create a new mini data.frame of four values so that we can have the geom_text() only at the end of the year (so similar to the final position of the graph).

final_positions <- dail_avg %>%
  group_by(party) %>%
  filter(decade == "2020s")  %>% 
  mutate(color = ifelse(party == "Sinn Féin", "#2fb66a",
         ifelse(party == "Fine Gael","#6699ff",
         ifelse(party == "Fianna Fáil","#ee9f27", 
         ifelse(party == "Labour", "#780000", "#495051")))))
# A tibble: 4 × 4
# Groups:   party [4]
  party       decade avg_female color  
  <chr>       <chr>       <dbl> <chr>  
1 Fianna Fáil 2020s       0.140 #ee9f27
2 Fine Gael   2020s       0.219 #6699ff
3 Labour      2020s       0.118 #780000
4 Sinn Féin   2020s       0.368 #2fb66a

A hex colour for each major party

party_pal <- c("Sinn Féin" = "#2fb66a",
                "Fine Gael" = "#6699ff",
                "Fianna Fáil" = "#ee9f27", 
                "Labour" = "#780000")

And a geom_bump() layer in the plot using the ggbump() package for more wavy lines.

dail_avg %>% 
  ggplot(aes(x = decade,
             y = avg_female, 
             group = party, 
             color = party)) + 

  ggbump::geom_bump(aes(color = party),
            smooth = 5,
            alpha = 0.5,
            size = 4)  +

  geom_point(color = "white", 
             size = 7, 
             stroke = 4) + 

  geom_point(size = 6) +

  ggrepel::geom_text_repel(data = final_positions,
            aes(color = party,
                y = avg_female,
                x = decade,
            label = party),
            family = "Arial Rounded MT Bold",
            vjust = -2,
            hjust = -1,
            size = 15) +
# my_style() 
  scale_color_manual(values = party_pal) +
  scale_y_continuous(labels = scales::label_percent()) +
  scale_x_discrete(expand = expansion(add = c(0.2, 2))) +
  theme(legend.position = "none") 

This graph looks at major Irish political parties from the 1920s to the 2020s.

For most of Irish history, female representation remained under 10%.

The Labour Party surged ahead like crazy in the 1990s; it got over 30% female TDs!

Now in the 2020s, Sinn Féin has the largest proportion of female TDs and goes way above and beyond the other major parties.


Now, onto constituency maps.

We can go to the Irish government’s website with heaps of data! Yay free data.

This page brings us to the election constituencies GeoJSON map data.

For more information about making GeoJSON and SF maps click here to read about how to create maps in R ~

So we read in the data and convert to SF dataframe.

constituency_map <- geojson_read(file.choose(), what = "sp")

constituency_sf <- st_as_sf(constituency_map)

This constituency_sf has 64 variables but most of them are meta-data info like the dates that each variable was updated. The vaaast majority, we don’t need so we can just pull out the consituency var for our use:

constituency_sf %>% 
  select(constituency = ENG_NAME_VALUE, 
         geometry) -> mini_constituency_sf
Simple feature collection with 1072 features and 1 field
Geometry type: POLYGON
Dimension:     XY
Bounding box:  xmin: 417437.9 ymin: 516356.4 xmax: 734489.6 ymax: 966899.7
Projected CRS: IRENET95 / Irish Transverse Mercator
First 10 features:
          constituency                       geometry
1  Cork South-West (3) POLYGON ((501759.8 527442.6...
2            Kerry (5) POLYGON ((451686.2 558529.2...
3            Kerry (5) POLYGON ((426695 561869.8, ...
4            Kerry (5) POLYGON ((451103.9 555882.8...
5            Kerry (5) POLYGON ((434925.3 572926.2...
6          Donegal (5) POLYGON ((564480.8 917991.7...
7          Donegal (5) POLYGON ((571201.9 892870.7...
8          Donegal (5) POLYGON ((615249.9 944590.2...
9          Donegal (5) POLYGON ((563593.8 897601, ...
10         Donegal (5) POLYGON ((647306 966899.4, ...

As we see, the number of seats in each constituency is in brackets behind the name of the county. So we can separate them and create a seat variable:

  mini_constituency_sf %<>% 
   separate(constituency, 
            into = c("constituency", "seats"), 
            sep = " \\(", fill = "right") %>%
   mutate(seats = as.numeric(gsub("\\)", "", seats))) 

One problem I realised along the way when I was trying to merge the constituency map with the TD politicians data is that one data.frame uses a hyphen and one uses a dash in the constituency variable.

So we can make a quick function to replace en dash (–) with hyphen (-).

 replace_dash <- function(x) {
   if (is.character(x)) {
     gsub("–", "-", x)  
   } else {x}
}

 mini_constituency_sf %<>%
   mutate(across(where(is.character), replace_dash))

And now we can merge!

 dail %<>%
   right_join(mini_constituency_sf, by = "constituency") 

Now a quick map ~

 dail %<>%
  mutate(n = ifelse(is.na(percentage_women), 0, percentage_women)) %>%
   ggplot(aes(geometry = geometry)) +
   geom_sf(aes(fill = percentage_women),
           color = "black") +  s
   labs(title = "Map of Irish Constituencies") +
   # my_style() +
   scale_fill_viridis_c(option = "plasma")  +

    scale_fill_gradient2(low = "#57cc99",
                         mid = "#38a3a5",
                         high = "#22577a") +

   theme(axis.text = element_blank(),
     axis.text.x.bottom = element_blank(),
     legend.key.width = unit(1.5, "cm"), 
     legend.key.height = unit(0.4, "cm"), 
     legend.position = "bottom")

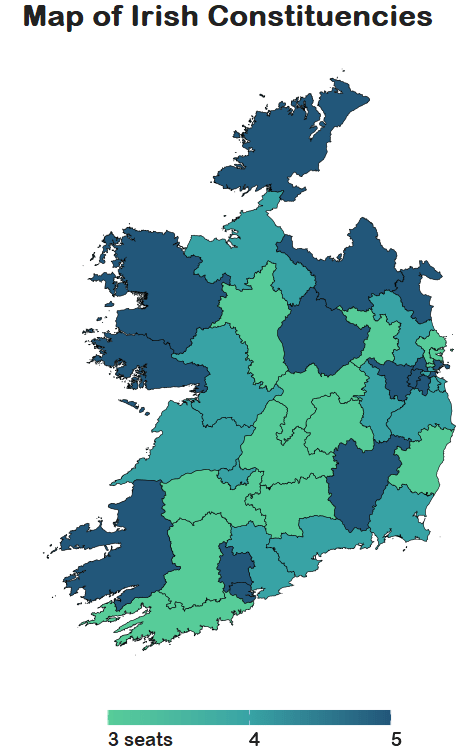
We can see that some constituencies have 3 seats, some 5~

So we cannot directly compare who has more female TDs.

A way to deal with this is scaling the data.

In PART 3, we will look at scaling data and analysing trends across the years!

Yay!

How to run multiple t-tests in a function with the broom package in R

Packages we will need:

library(tidyverse)
library(broom)

We will use the Varieties of Democracy dataset again.

Excited Will Ferrell GIF - Find & Share on GIPHY

We will use a t-test comparing democracies (boix == 1) and non-democracies (boix == 0) in the years 2000 to 2020.

We need to remove the instances where boix is NA.

I choose three t-tests to run simultaneously. Comparing democracies and non-democracies on:

  1. the extent to which the country consults religious groups (relig_consult)
  2. the extent to which the country consults Civil Society Organization (CSO) groups (cso_consult)
  3. level of freedom from judicial corruption (judic_corruption) – higher scores mean that there are FEWER instances of judicial corruption
vdem %>% 
filter(year %in% c(2000:2020)) %>%
filter(!is.na(e_boix_regime)) %>%
group_by(e_boix_regime) %>%
select(relig_consult = v2csrlgcon,
cso_consult = v2cscnsult,
judic_corruption = v2jucorrdc) -> vdem

Next we need to pivot the data from wide to long

  vdem %<>% pivot_longer(!e_boix_regime, 
names_to = "variable",
values_to = "value")

Now we get to iterating over the three variables and conducting a t-test on each variable across democracies versus non-democracies

Excited Elf GIF - Find & Share on GIPHY
vdem %>%
group_by(variable) %>%
nest() %>%
mutate(t_test = map(data, ~t.test(value ~ e_boix_regime, data = .x)),
tidy = map(t_test, broom::tidy)) %>%
select(variable, tidy) %>%
unnest(tidy) -> ttest_results

If we look closely at the line

mutate(t_test = map(data, ~t.test(value ~ e_boix_regime, data = .x))):

Here, mutate() adds a new column named t_test to the grouped and nested data.

map() is used to apply a function to each element of the list-column (here, each nested data frame).

The function applied is t.test(value ~ e_boix_regime, data = .x).

This function performs a t-test comparing the means of value across two groups defined by e_boix_regime within each nested data frame.

.x represents each nested data frame in turn.

And here are the tidy results:

If we save the above results in a data.frame, we can graph the following:

ttest_results %>%
ggplot(aes(x = variable, y = estimate, ymin = conf.low, ymax = conf.high)) +
geom_point() +
geom_errorbar(width = 0.2) +
coord_flip() +
labs(title = "T-Test Estimates with Confidence Intervals",
x = "Variable",
y = "Estimate Difference") +
theme_minimal()

Add some colors to highlight magnitude of difference

  ggplot(aes(x = variable, y = estimate, ymin = conf.low, ymax = conf.high, color = color_value)) +
geom_point() +
geom_errorbar(width = 0.7, size = 3) +
scale_color_gradientn(colors = c("#0571b0", "#92c5de", "#f7f7f7", "#f4a582", "#ca0020")) +
coord_flip() +
labs(title = "T-Test Estimates with Confidence Intervals",
x = "Variable",
y = "Estimate Difference") +
theme_minimal() +
guides(color = guide_colorbar(title = ""))

Sometimes vdem variables are reverse scored or on different scales

  # mutate(across(judic_corruption, ~ 1- .x)) %>% 
# mutate(across(everything(), ~(.x - mean(.x, na.rm = TRUE)) / sd(.x, na.rm = TRUE), .names = "z_{.col}")) %>%
# select(contains("z_"))

How to run cross-validation of decision-tree models with xgboost in R (PART 4 Tidymodels series)

In this blog post, we will cross-validate different boosted tree models and find the one with best root mean square error (RMSE).

Specifically, part 2 goes into more detail about RMSE as a way to choose the best model

Click here to read part 1, part 2 or part 3 of this series on tidymodel package stuff.

Packages we will need:

library(tidymodels)
library(tidyverse)

Our resampling method will be 10-fold cross-validation.

Click here to watch a Youtube explainer by StatQuest on the fundamentals of cross validation. StatQuest is the cat’s pyjamas.

We can use the vfold_cv() function to create a set of “V-fold” cross-validation with 11 splits.

My favorite number is 11 so I’ll set that as the seed too.

set.seed(11) 
cross_folds <- vfold_cv(vdem_1990_2019, v = 11)

We put our formula into the recipe function and run the pre-processing steps: in this instance, we are just normalizing the variables.

my_recipe <- recipe(judic_corruption ~ freedom_religion + polarization, 
data = vdem_1990_2019) %>%
step_normalize(all_predictors(), -all_outcomes())

Here, we will initially define a boost_tree() model without setting any hyperparameters.

This is our baseline model with defaults.

With the vfolds, we be tuning them and choosing the best parameters.

For us, our mode is “regression” (not categorical “classification”)

my_tree <- boost_tree(
mode = "regression",
engine = "xgboost") %>%
set_engine("xgboost") %>%
set_mode("regression")

Next we will set up a grid to explore a range of hyperparameters.

my_grid <- grid_latin_hypercube(
trees(range = c(500, 1500)),
tree_depth(range = c(3, 10)),
learn_rate(range = c(0.01, 0.1)),
size = 20)

We use the grid_latin_hypercube() function from the dials package in R is used to generate a sampling grid for tuning hyperparameters using a Latin hypercube sampling method.

Latin hypercube sampling (LHS) is a way to generate a sample of plausible, semi-random collections of parameter values from a distribution.

This method is used to ensure that each parameter is uniformly sampled across its range of values. LHS is systematic and stratified, but within each stratum, it employs randomness.

Source: https://www.youtube.com/watch?app=desktop&v=Evua529dAgc

Inside the grid_latin_hypercube() function,we can set the ranges for the model parameters,

trees(range = c(500, 1500))

This parameter specifies the number of trees in the model

We can set a sampling range from 500 to 1500 trees.

tree_depth(range = c(3, 10))

This defines the maximum depth of each tree

We set values ranging from 3 to 10.

learn_rate(range = c(0.01, 0.1))

This parameter controls the learning rate, or the step size at each iteration while moving toward a minimum of a loss function.

It’s specified to vary between 0.01 and 0.1.

size = 20

We want the Latin Hypercube Sampling to generate 20 unique combinations of the specified parameters. Each of these combinations will be used to train a model, allowing for a systematic exploration of how different parameter settings impact model performance.

> my_grid

# A tibble: 20 × 3
   trees tree_depth learn_rate
   <int>      <int>      <dbl>
 1   803          7       1.03
 2   981          7       1.18
 3   862          6       1.09
 4  1185          9       1.06
 5   763          8       1.13
 6   593          4       1.11
 7   524          7       1.22
 8   743          3       1.17
 9  1347          5       1.07
10  1010          5       1.15
11   677          3       1.25
12  1482          5       1.05
13  1446          8       1.12
14   917          4       1.23
15  1296          6       1.04
16  1391          8       1.23
17  1106          9       1.18
18  1203          5       1.14
19   606         10       1.20
20  1088          9       1.10

So next, we will combine our recipe, model specification, and resampling method in a workflow, and use tune_grid() to find the best hyperparameters based on RMSE.

my_workflow <- workflow() %>%
add_recipe(my_recipe) %>%
add_model(my_tree)

The tune_grid() function does the hyperparameter tuning. We will make different combinations of hyperparameters specified in grid using cross-validation.

tuning_results <- my_workflow %>%
tune_grid(
resamples = cv_folds,
grid = my_grid,
metrics = metric_set(rmse))
# Tuning results
# 10-fold cross-validation 
# A tibble: 10 × 4
   splits             id     .metrics         .notes          
   <list>             <chr>  <list>           <list>          
 1 <split [3200/356]> Fold01 <tibble [1 × 4]> <tibble [0 × 3]>
 2 <split [3200/356]> Fold02 <tibble [1 × 4]> <tibble [0 × 3]>
 3 <split [3200/356]> Fold03 <tibble [1 × 4]> <tibble [0 × 3]>
 4 <split [3200/356]> Fold04 <tibble [1 × 4]> <tibble [0 × 3]>
 5 <split [3200/356]> Fold05 <tibble [1 × 4]> <tibble [0 × 3]>
 6 <split [3200/356]> Fold06 <tibble [1 × 4]> <tibble [0 × 3]>
 7 <split [3201/355]> Fold07 <tibble [1 × 4]> <tibble [0 × 3]>
 8 <split [3201/355]> Fold08 <tibble [1 × 4]> <tibble [0 × 3]>
 9 <split [3201/355]> Fold09 <tibble [1 × 4]> <tibble [0 × 3]>
10 <split [3201/355]> Fold10 <tibble [1 × 4]> <tibble [0 × 3]>

After tuning, we can extract and examine the best models.

show_best(tuning_results, metric = "rmse")
  trees tree_depth learn_rate .metric .estimator  mean     n std_err .config              
  <int>      <int>      <dbl> <chr>   <chr>      <dbl> <int>   <dbl> <chr>                
1   593          4       1.11 rmse    standard   0.496    10  0.0189 Preprocessor1_Model03
2   677          3       1.25 rmse    standard   0.500    10  0.0216 Preprocessor1_Model02
3  1296          6       1.04 rmse    standard   0.501    10  0.0238 Preprocessor1_Model09
4  1010          5       1.15 rmse    standard   0.501    10  0.0282 Preprocessor1_Model08
5  1482          5       1.05 rmse    standard   0.502    10  0.0210 Preprocessor1_Model05

The best model is model number 3!

The Fresh Prince Of Bel Air Reaction GIF - Find & Share on GIPHY

Finally, we can plot it out.

We use collect_metrics() to pull out the RMSE and other metrics from our samples.

It automatically aggregates the results across all resampling iterations for each unique combination of model hyperparameters, providing mean performance metrics (e.g., mean accuracy, mean RMSE) and their standard errors.

rmse_results <- tuning_results %>%
collect_metrics() %>%
filter(.metric == "rmse")
rmse_results %>%
mutate(.config = str_replace(.config, "^Preprocessor1_", "")) %>%
ggplot(aes(x = .config, y = mean)) +
geom_line(aes(group = 1), color = "#023047", size = 2, alpha = 0.6) +
geom_point(size = 3) +
bbplot::bbc_style() +
labs(title = "Mean RMSE for Different Models") +
theme(axis.text.x = element_text(angle = 45, hjust = 1))

How to run decision tree analysis with xgboost in R (Tidymodels Series PART 3)

Packages we will need:

library(tidymodels)
library(tidyverse)

In this blog post, we are going to run boosted decision trees with xgboost in tidymodels.

Boosted decision trees are a type of ensemble learning technique.

Ensemble learning methods combine the predictions from multiple models to create a final prediction that is often more accurate than any single model’s prediction.

The ensemble consists of a series of decision trees added sequentially, where each tree attempts to correct the errors of the preceding ones.

Source: https://towardsdatascience.com/10-decision-trees-are-better-than-1-719406680564

Similar to the previous blog, we will use Varieties of Democracy data and we will examine the relationship between judicial corruption and public sector theft.

Click here to read Part 1 of the tidymodels series

vdem <- read.csv(file.choose))

vdem %>%
select(judic_corruption = v2jucorrdc,
ps_theft = v2exthftps,
country_name,
year) -> vdem_vars

vdem_vars <- na.omit(vdem_vars)

We will divide the dataset into one from years 1990 to 2019 and a separate 2020 dataset.

vdem_vars %>% 
filter(year > 1989 & year < 2020) -> vdem_1990_2019

vdem_vars %>%
filter(year == 2020) -> vdem_2020

Now we will create our recipe with the model formula and any steps to mutate the variables

recipe_spec <- recipe(judic_corruption ~ ps_theft, 
data = vdem_1990_2019) %>%
step_normalize(all_predictors(), -all_outcomes())

Next we will set our decision tree.

boost_tree_spec <- boost_tree(
mode = "regression",
trees = 1000,
tree_depth = 3,
min_n = 10,
loss_reduction = 0.01,
sample_size = 0.5,
mtry = 2,
learn_rate = 0.01,
engine = "xgboost"
)

Let’s take a look at each part of this big step.

mode specifies the type of predictive modeling that we are running.

Common modes are:

  • "regression" for predicting numeric outcomes,
  • "classification" for predicting categorical outcomes,
  • "censored" for time-to-event (survival) models.

The mode we choose is regression.

Next we add the number of trees to include in the ensemble.

More trees can improve model accuracy but also increase computational cost and risk of overfitting. The choice of how many trees to use depends on the complexity of the dataset and the diminishing returns of adding more trees.

We will choose 1000 trees.

tree_depth indicates the maximum depth of each tree. The depth of a tree is the length of the longest path from a root to a leaf, and it controls the complexity of the model.

Deeper trees can model more complex relationships but also increase the risk of overfitting. A smaller tree depth helps keep the model simpler and more generalizable.

Our model is quite simple, so we can choose 3.

When your model is very simple, for instance, having only one independent variable, the need for deep trees diminishes. This is because there are fewer interactions between variables to consider (in fact, no interactions in the case of a single variable), and the complexity that a model can or should capture is naturally limited.

For a model with a single predictor, starting with a lower max_depth value (e.g., 3 to 5) is sensible. This setting can provide a balance between model simplicity and the ability to capture non-linear relationships in the data.

The best way to determine the optimal max_depth is with cross-validation. This involves training models with different values of max_depth and evaluating their performance on a validation set. The value that results in the best cross-validated metric (e.g., RMSE for regression, accuracy for classification) is the best choice.

We will look at RMSE at the end of the blog.

Next we look at the min_n, which is the minimum number of data points allowed in a node to attempt a new split. This parameter controls overfitting by preventing the model from learning too much from the noise in the training data. Higher values result in simpler models.

We choose min_n of 10.

loss_reduction is the minimum loss reduction required to make a further partition on a leaf node of the tree. It’s a way to control the complexity of the model; larger values result in simpler models by making the algorithm more conservative about making additional splits.

We input a loss_reduction of 0.01.

A low value (like 0.01) means that the model will be more inclined to make splits as long as they provide even a slight improvement in loss reduction.

This can be advantageous in capturing subtle nuances in the data but might not be as critical in a simple model where the potential for overfitting is already lower due to the limited number of predictors.

sample_size determines the fraction of data to sample for each tree. This parameter is used for stochastic boosting, where each tree is trained on a random subset of the full dataset. It introduces more variation among the trees, can reduce overfitting, and can improve model robustness.

Our sample_size is 0.5.

While setting sample_size to 0.5 is a common practice in boosting to help with overfitting and improve model generalization, its optimality for a model with a single independent variable may not be suitable.

We can test different values through cross-validation and monitoring the impact on both training and validation metrics

mtry indicates the number of variables randomly sampled as candidates at each split. For regression problems, the default is to use all variables, while for classification, a commonly used default is the square root of the number of variables. Adjusting this parameter can help in controlling model complexity and overfitting.

For this regression, our mtry will equal 2 variables at each split

learn_rate is also known as the learning rate or shrinkage. This parameter scales the contribution of each tree.

We will use a learn_rate = 0.01.

A smaller learning rate requires more trees to model all the relationships but can lead to a more robust model by reducing overfitting.

Finally, engine specifies the computational engine to use for training the model. In this case, "xgboost" package is used, which stands for eXtreme Gradient Boosting.

Season 6 Nbc GIF - Find & Share on GIPHY

When to use each argument:

Mode: Always specify this based on the type of prediction task at hand (e.g., regression, classification).

Trees, tree_depth, min_n, and loss_reduction: Adjust these to manage model complexity and prevent overfitting. Start with default or moderate values and use cross-validation to find the best settings.

Sample_size and mtry: Use these to introduce randomness into the model training process, which can help improve model robustness and prevent overfitting. They are especially useful in datasets with a large number of observations or features.

Learn_rate: Start with a low to moderate value (e.g., 0.01 to 0.1) and adjust based on model performance. Smaller values generally require more trees but can lead to more accurate models if tuned properly.

Engine: Choose based on the specific requirements of the dataset, computational efficiency, and available features of the engine.

NOW, we add the two steps together in the oven.

Season 5 Cooking GIF by Living Single - Find & Share on GIPHY
workflow_spec <- workflow() %>%
add_recipe(recipe_spec) %>%
add_model(boost_tree_spec)

And we fit the model with the data

fit <- workflow_spec %>%
fit(data = vdem_1990_2019)
══ Workflow [trained] 
Preprocessor: Recipe
Model: boost_tree()

── Preprocessor 
1 Recipe Step

• step_normalize()

── Model 
##### xgb.Booster
raw: 2.2 Mb 
call:
  xgboost::xgb.train(params = list(eta = 0.01, 
                                                             max_depth = 6, 
                                                             gamma = 0.01, 
colsample_bytree = 1, 
colsample_bynode = 1, 
min_child_weight = 10, 
subsample = 0.5), 
data = x$data, 
nrounds = 1000,
watchlist = x$watchlist, 
verbose = 0, 
nthread = 1, 
objective = "reg:squarederror")

params (as set within xgb.train):
eta = "0.01", 
max_depth = "6", 
gamma = "0.01", 
colsample_bytree = "1", 
colsample_bynode = "1", 
min_child_weight = "10", 
subsample = "0.5", 
nthread = "1", 
objective = "reg:squarederror", 
validate_parameters = "TRUE"
xgb.attributes: niter
callbacks: cb.evaluation.log()
# of features: 1 
niter: 1000
nfeatures : 1 
evaluation_log:
     iter training_rmse
    <num>         <num>
        1     1.5329271
        2     1.5206092
---                    
      999     0.4724800
     1000     0.4724075

We can now see how well our model can predict year 2020 data.

predictions <- predict(fit, new_data = vdem_2020)
predicted_values <- predictions$.pred

predicted_probabilities <- predict(fit, new_data = new_data, type = "prob") 
# For probabilities

Evaluating regression model performance using true values of judicial corruption

  actual_vs_predicted <- vdem_2020 %>%
select(judic_corruption) %>%
bind_cols(predictions)

Finally, we calculate metrics like RMSE, MAE, etc., using `yardstick`

  metrics <- actual_vs_predicted %>%
metrics(truth = judic_corruption, estimate = .pred)

rmse_val <- actual_vs_predicted %>%
rmse(truth = judic_corruption, estimate = .pred)

mae_val <- actual_vs_predicted %>%
mae(truth = judic_corruption, estimate = .pred)

print(metrics)
print(rmse_val)
print(mae_val)
.metric .estimator .estimate
  <chr>   <chr>          <dbl>
1 rmse    standard       0.661
2 rsq     standard       0.796
3 mae     standard       0.525

How to run linear regression analysis with tidymodels in R for temporal prediction (Tidymodels Series PART 2)

Packages we will need:

library(tidyverse)
library(tidymodels)
library(magrittr)

We will look at Varieties of Democracy dataset

vdem %>% 
select(judic_corruption = v2jucorrdc,
corruption = v2xnp_regcorr,
freedom_kill= v2clkill,
freedom_torture = v2cltort,
freedom_religion = v2clrelig,
ps_theft = v2exthftps,
country_name,
year) -> vdem

We will create two datasets: one for all years EXCEPT 2020 and one for only 2020

vdem %>% 
filter(year > 1989 & year < 2020) -> vdem_1990_2019

vdem %>%
filter(year == 2020) -> vdem_2020

First we build the model. We will look at whether level of public sector theft can predict the judicial corruption levels.

The model will have three parts

linear_reg() : This is the foundational step indicating the type of regression we want to run

set_engine() : This is used to specify which package or system will be used to fit the model, along with any arguments specific to that software. With a linear regression, we don’t really need any special package.

set_mode("regression") : In our regression model, the model predicts continuous outcomes. If we wanted to use a categorical variable, we would choose “classification

linear_spec <- linear_reg() %>%
set_engine("lm") %>%
set_mode("regression")

If we print out the linear_spec object, it gives us information about the model specifications we had just fed in!

> linear_spec
Linear Regression Model Specification (regression)

Computational engine: lm 

class(linear_spec)
[1] "linear_reg" "model_spec"

Now we create a “recipe” with our model formula and any steps we take to change the variables.

recipe_spec <- recipe(judic_corruption ~ ps_theft, data = vdem_1990_2019) %>%
step_normalize(all_predictors(), -all_outcomes())

Click here to look at all the possible steps we can add to the regression recipe

https://recipes.tidymodels.org/reference

When we print this out, it shows us the stages in our lm “recipe”

── Recipe 

── Inputs 
Number of variables by role
outcome:   1
predictor: 2

── Operations 
• Centering and scaling for: all_predictors(), 

Finally, we are going to feed the recipe and the model specification into the workflow “oven”, if we want to keep the cooking metaphor going.

linear_workflow <- workflow() %>%
add_recipe(recipe_spec) %>%
add_model(linear_spec) %>%
fit(data = vdem_1990_2019)

We can tidy up the results of the linear regression with the tidy() function

linear_workflow %>% tidy()

Printing out a tidy version of the data

linear_workflow %>% tidy()
# A tibble: 31 × 5
   term                   estimate std.error statistic p.value
   <chr>                     <dbl>     <dbl>     <dbl>   <dbl>
 1 (Intercept)            0.0822      0.0584   1.41      0.160
 2 ps_theft                    1.29        0.0105 123.        0    
 3 year-1.57179471038752 -0.0175      0.0825  -0.212     0.832
 4 year-1.45612480773099 -0.0119      0.0824  -0.144     0.885
 5 year-1.34045490507446 -0.0321      0.0823  -0.390     0.697
 6 year-1.22478500241793  0.00679     0.0823   0.0825    0.934
 7 year-1.1091150997614   0.000206    0.0823   0.00250   0.998
 8 year-0.99344519710487 -0.00175     0.0823  -0.0213    0.983
 9 year-0.87777529444834  0.00339     0.0823   0.0412    0.967
10 year-0.76210539179181 -0.00774     0.0822  -0.0942    0.925
# ℹ 21 more rows
# ℹ Use `print(n = ...)` to see more rows

Now we can see does the model from 1990 to 2019 predict the values in 2020?

Natasha Lyonne GIF by Golden Globes - Find & Share on GIPHY
predictions <- predict(linear_workflow, new_data = vdem_2020) %>%
bind_cols(vdem_2020)
> predictions
# A tibble: 179 × 6
    .pred judic_corruption ps_theft country_name   year  diff
    <dbl>            <dbl>    <dbl> <chr>         <int> <dbl>
 1 -0.447           -2.21    -0.693 Pakistan       2020  1.77
 2  1.03            -0.722    1.04  Tunisia        2020  1.76
 3  0.319           -1.38     0.205 Burkina Faso   2020  1.70
 4  0.228           -1.33     0.098 Bolivia        2020  1.56
 5 -0.569           -2.05    -0.837 Comoros        2020  1.48
 6 -1.73            -3.01    -2.19  Azerbaijan     2020  1.28
 7  0.469           -0.781    0.381 Peru           2020  1.25
 8  0.623           -0.578    0.562 Burma/Myanmar  2020  1.20
 9  1.64             0.478    1.76  Benin          2020  1.16
10  2.65             1.52     2.94  Luxembourg     2020  1.13
# ℹ 169 more rows
# ℹ Use `print(n = ...)` to see more rows

We can look at the RMSE, R square and MAE scores

In regression analysis, Root Mean Square Error (RMSE), R-squared (R²), and Mean Absolute Error (MAE) are metrics used to evaluate the performance and accuracy of regression models.

We use the metrics function from the yardstick package.

predictions represents the predicted values generated by your model. These are typically the values your model predicts for the outcome variable based on the input data.

truth is the actual or true values of the outcome variable. It is what you are trying to predict with your model. In the context of your code, judic_corruption is likely the true values of judicial corruption, against which the predictions are being compared.

The estimate argument is optional. It is used when the predictions are stored under a different name or within a different object.

metrics <- yardstick::metrics(predictions, truth = judic_corruption, estimate = .pred)

And here are the three metrics to judge how “good” our predictions are~

> metrics
# A tibble: 3 × 3
  .metric .estimator .estimate
  <chr>   <chr>          <dbl>
1 rmse    standard       0.774
2 rsq     standard       0.718
3 mae     standard       0.622

Determining whether RMSE, R-squared (R2), and MAE values are “good” depends on several factors, including the context of your specific problem, the scale of the outcome variable, and the performance of other models in the same domain.

RMSE (Root mean square deviation)

rmse <- sqrt(mean(predictions$diff^2))
  • RMSE measures the average magnitude of the errors between predicted and actual values.
  • Lower RMSE values indicate better model performance, with 0 representing a perfect fit.
  • Lower RMSE values indicate better model performance.
  • It’s common to compare the RMSE of your model to the RMSE of a baseline model or other competing models in the same domain.
  • The interpretation of “good” RMSE depends on the scale of your outcome variable. A small RMSE relative to the range of the outcome variable suggests better predictive accuracy.

R-squared

  • Higher R-squared values indicate a better fit of the model to the data.
  • However, R-squared alone does not indicate whether the model is “good” or “bad” – it should be interpreted in conjunction with other factors.
  • A high R-squared does not necessarily mean that the model makes accurate predictions.
  • This is especially if it is overfitting the data.
  • R-squared represents the proportion of the variance in the dependent variable that is predictable from the independent variables.
  • Values closer to 1 indicate a better fit, with 1 representing a perfect fit.

MAE (Mean Absolute Error):

  • Similar to RMSE, lower MAE values indicate better model performance.
  • MAE is less sensitive to outliers compared to RMSE, which may be advantageous depending on the characteristics of your data.
  • MAE measures the average absolute difference between predicted and actual values.
  • Like RMSE, lower MAE values indicate better model performance, with 0 representing a perfect fit.

And now we can plot out the differences between predicted values and actual values for judicial corruption scores

We can add labels for the countries that have the biggest difference between the predicted values and the actual values – i.e. the countries that our model does not predict well. These countries can be examined in more detail.

First we add a variable that calculates the absolute difference between the actual judicial corruption variable and the value that our model predicted.

Then we use filter to choose the top ten countries

And finally in the geom_repel() layer, we use this data to add the labels to the plot

predictions <- predictions %>%
mutate(difference = abs(judic_corruption - .pred),
rank = rank(-difference))

top_countries <- predictions %>%
filter(rank <= 10)

predictions %>%
ggplot(aes(x = judic_corruption, y = .pred)) +
geom_point(color = "#1d3557", alpha = 0.6, size = 4) +
ggrepel::geom_label_repel(data = top_countries, aes(label = country_name),
nudge_y = 0.15, color = "#14213d", size = 3.5, alpha = 0.7) +
geom_abline(intercept = 0, slope = 1, linetype = "dashed",
color = "#6a040f", size = 3, alpha = 0.75) +
ggtitle("Actual vs. Predicted Judicial Corruption Scores") +
xlab("Actual Scores") +
ylab("Predicted Scores") +
xlim(c(-3, 3)) +
ylim(c(-3, 3)) +
bbplot::bbc_style() +
theme(plot.title = element_text(hjust = 0.5))

How to run regressions with the tidymodels package in R: PART 1


The tidymodels framework in R is a collection of packages for modeling.

Within tidymodels, the parsnip package is primarily responsible for specifying models in a way that is independent of the underlying modeling engines. The set_engine() function in parsnip allows users to specify which computational engine to use for modeling, enabling the same model specification to be used across different packages and implementations.

 - Find & Share on GIPHY

In this blog series, we will look at some commonly used models and engines within the tidymodels package

  1. Linear Regression (lm): The classic linear regression model, with the default engine being stats, referring to the base R stats package.
  2. Logistic Regression (logistic_reg): Used for binary classification problems, with engines like stats for the base R implementation and glmnet for regularized regression.
  3. Random Forest (rand_forest): A popular ensemble method for classification and regression tasks, with engines like ranger and randomForest.
  4. Boosted Trees (boost_tree): Used for boosting tasks, with engines such as xgboost, lightgbm, and catboost.
  5. Decision Trees (decision_tree): A base model for classification and regression, with engines like rpart and C5.0.
  6. K-Nearest Neighbors (nearest_neighbor): A simple yet effective non-parametric method, with engines like kknn and caret.
  7. Principal Component Analysis (pca): For dimensionality reduction, with the stats engine.
  8. Lasso and Ridge Regression (linear_reg): For regression with regularization, specifying the penalty parameter and using engines like glmnet.

Click here for some resources I found:

  1. https://rviews.rstudio.com/2019/06/19/a-gentle-intro-to-tidymodels
  2. https://rpubs.com/chenx/tidymodels_tutorial
  3. https://bookdown.org/paul/ai_ml_for_social_scientists/06_01_ml_with_tidymodels.html

How to interpret linear models with the broom package in R

Packages you will need:

library(tidyverse)
library(magrittr)     # for pipes

library(broom)        # add model variables
library(easystats)    # diagnostic graphs

library(WDI)           # World Bank data
library(democracyData) # Freedom House data

library(countrycode)   # add ISO codes
library(bbplot)        # pretty themes
library(ggthemes)      # pretty colours
library(knitr)         # pretty tables
library(kableExtra)    # make pretty tables prettier

This blog will look at the augment() function from the broom package.

After we run a liner model, the augment() function gives us more information about how well our model can accurately preduct the model’s dependent variable.

It also gives us lots of information about how does each observation impact the model. With the augment() function, we can easily find observations with high leverage on the model and outlier observations.

For our model, we are going to use the “women in business and law” index as the dependent variable.

According to the World Bank, this index measures how laws and regulations affect women’s economic opportunity.

Overall scores are calculated by taking the average score of each index (Mobility, Workplace, Pay, Marriage, Parenthood, Entrepreneurship, Assets and Pension), with 100 representing the highest possible score.

Into the right-hand side of the model, our independent variables will be child mortality, military spending by the government as a percentage of GDP and Freedom House (democracy) Scores.

First we download the World Bank data and summarise the variables across the years.

Click here to read more about the WDI package and downloading variables from the World Bank website.

women_business = WDI(indicator = "SG.LAW.INDX")
mortality = WDI(indicator = "SP.DYN.IMRT.IN")
military_spend_gdp <- WDI(indicator = "MS.MIL.XPND.ZS")

We get the average across 60 ish years for three variables. I don’t want to run panel data regression, so I get a single score for each country. In total, there are 160 countries that have all observations. I use the countrycode() function to add Correlates of War codes. This helps us to filter out non-countries and regions that the World Bank provides. And later, we will use COW codes to merge the Freedom House scores.

women_business %>%
  filter(year > 1999) %>% 
  inner_join(mortality) %>% 
  inner_join(military_spend_gdp) %>% 
  select(country, year, iso2c, 
         fem_bus = SG.LAW.INDX, 
         mortality = SP.DYN.IMRT.IN,
         mil_gdp = MS.MIL.XPND.ZS)  %>% 
  mutate_all(~ifelse(is.nan(.), NA, .)) %>% 
  select(-year) %>% 
  group_by(country, iso2c) %>% 
  summarize(across(where(is.numeric), mean,  
   na.rm = TRUE, .names = "mean_{col}")) %>% 
  ungroup() %>% 
  mutate(cown = countrycode::countrycode(iso2c, "iso2c", "cown")) %>% 
  filter(!is.na(cown)) -> wdi_summary

Next we download the Freedom House data with the democracyData package.

Click here to read more about this package.

fh <- download_fh()

fh %>% 
  group_by(fh_country) %>% 
  filter(year > 1999) %>% 
  summarise(mean_fh = mean(fh_total, na.rm = TRUE)) %>% 
  mutate(cown = countrycode::countrycode(fh_country, "country.name", "cown")) %>% 
  mutate_all(~ifelse(is.nan(.), NA, .)) %>% 
  filter(!is.na(cown))  -> fh_summary

We join both the datasets together with the inner_join() functions:

fh_summary %>%
  inner_join(wdi_summary, by = "cown") %>% 
  select (-c(cown, iso2c, fh_country)) -> wdi_fh

Before we model the data, we can look at the correlation matrix with the corrplot package:

wdi_fh %>% 
  drop_na() %>% 
  select(-country)  %>% 
  select(`Females in business` = mean_fem_bus,
        `Mortality rate` = mean_mortality,
        `Freedom House` = mean_fh,
        `Military spending GDP` = mean_mil_gdp)  %>% 
  cor() %>% 
  corrplot(method = 'number',
           type = 'lower',
           number.cex = 2, 
           tl.col = 'black',
           tl.srt = 30,
           diag = FALSE)

Next, we run a simple OLS linear regression. We don’t want the country variables so omit it from the list of independent variables.

fem_bus_lm <- lm(mean_fem_bus ~ . - country, data = wdi_fh)
Dependent variable:
mean_fem_bus
mean_fh-2.807***
(0.362)
mean_mortality-0.078*
(0.044)
mean_mil_gdp-0.416**
(0.205)
Constant94.684***
(2.024)
Observations160
R20.557
Adjusted R20.549
Residual Std. Error11.964 (df = 156)
F Statistic65.408*** (df = 3; 156)
Note:*p<0.1; **p<0.05; ***p<0.01

We can look at some preliminary diagnostic plots.

Click here to read more about the easystat package. I found it a bit tricky to download the first time.

performance::check_model(fem_bus_lm)

The line is not flat at the beginning so that is not ideal..

We will look more into this later with the variables we create with augment() a bit further down this blog post.

None of our variables have a VIF score above 5, so that is always nice to see!

From the broom package, we can use the augment() function to create a whole heap of new columns about the variables in the model.

fem_bus_pred <- broom::augment(fem_bus_lm)

  • .fitted = this is the model prediction value for each country’s dependent variable score. Ideally we want them to be as close to the actual scores as possible. If they are totally different, this means that our independent variables do not do a good job explaining the variance in our “women in business” index.

  • .resid = this is actual dependent variable value minus the .fitted value.

We can look at the fitted values that the model uses to predict the dependent variable – level of women in business – and compare them to the actual values.

The third column in the table is the difference between the predicted and actual values.

fem_bus_pred %>% 
  mutate(across(where(is.numeric), ~round(., 2))) %>%
  arrange(mean_fem_bus) %>% 
  select(Country = country,
    `Fem in bus (Actual)` = mean_fem_bus,
    `Fem in bus (Predicted)` = .fitted,
    `Fem in bus (Difference)` = .resid,
                  `Mortality rate` = mean_mortality,
                  `Freedom House` = mean_fh,
                  `Military spending GDP` = mean_mil_gdp)  %>% 
  kbl(full_width = F) 
Country Leverage of country Fem in bus (Actual) Fem in bus (Predicted)
Austria 0.02 88.92 88.13
Belgium 0.02 92.13 87.65
Costa Rica 0.02 79.80 87.84
Denmark 0.02 96.36 87.74
Finland 0.02 94.23 87.74
Iceland 0.02 96.36 88.90
Ireland 0.02 95.80 88.18
Luxembourg 0.02 94.32 88.33
Sweden 0.02 96.45 87.81
Switzerland 0.02 83.81 87.78

And we can graph them out:

fem_bus_pred %>%
  mutate(fh_category = cut(mean_fh, breaks =  5,
  labels = c("full demo ", "high", "middle", "low", "no demo"))) %>%         ggplot(aes(x = .fitted, y = mean_fem_bus)) + 
  geom_point(aes(color = fh_category), size = 4, alpha = 0.6) + 
  geom_smooth(method = "loess", alpha = 0.2, color = "#20948b") + 
  bbplot::bbc_style() + 
  labs(x = '', y = '', title = "Fitted values versus actual values")

In addition to the predicted values generated by the model, other new columns that the augment function adds include:

  • .hat = this is a measure of the leverage of each variable.

  • .cooksd = this is the Cook’s Distance. It shows how much actual influence the observation had on the model. Combines information from .residual and .hat.

  • .sigma = this is the estimate of residual standard deviation if that observation is dropped from model

  • .std.resid = standardised residuals

If we look at the .hat observations, we can examine the amount of leverage that each country has on the model.

fem_bus_pred %>% 
  mutate(dplyr::across(where(is.numeric), ~round(., 2))) %>%
  arrange(desc(.hat)) %>% 
  select(Country = country,
         `Leverage of country` = .hat,
         `Fem in bus (Actual)` = mean_fem_bus,
         `Fem in bus (Predicted)` = .fitted)  %>% 
  kbl(full_width = F) %>%
  kable_material_dark()

Next, we can look at Cook’s Distance. This is an estimate of the influence of a data point.  According to statisticshowto website, Cook’s D is a combination of each observation’s leverage and residual values; the higher the leverage and residuals, the higher the Cook’s distance.

  1. If a data point has a Cook’s distance of more than three times the mean, it is a possible outlier
  2. Any point over 4/n, where n is the number of observations, should be examined
  3. To find the potential outlier’s percentile value using the F-distribution. A percentile of over 50 indicates a highly influential point
fem_bus_pred %>% 
  mutate(fh_category = cut(mean_fh, 
breaks =  5,
  labels = c("full demo ", "high", "middle", "low", "no demo"))) %>%  
  mutate(outlier = ifelse(.cooksd > 4/length(fem_bus_pred), 1, 0)) %>% 
  ggplot(aes(x = .fitted, y = .resid)) +
  geom_point(aes(color = fh_category), size = 4, alpha = 0.6) + 
  ggrepel::geom_text_repel(aes(label = ifelse(outlier == 1, country, NA))) + 
  labs(x ='', y = '', title = 'Influential Outliers') + 
  bbplot::bbc_style() 

We can decrease from 4 to 0.5 to look at more outliers that are not as influential.

Also we can add a horizontal line at zero to see how the spread is.

fem_bus_pred %>% 
  mutate(fh_category = cut(mean_fh, breaks =  5,
labels = c("full demo ", "high", "middle", "low", "no demo"))) %>%  
  mutate(outlier = ifelse(.cooksd > 0.5/length(fem_bus_pred), 1, 0)) %>% 
  ggplot(aes(x = .fitted, y = .resid)) +
  geom_point(aes(color = fh_category), size = 4, alpha = 0.6) + 
  geom_hline(yintercept = 0, color = "#20948b", size = 2, alpha = 0.5) + 
  ggrepel::geom_text_repel(aes(label = ifelse(outlier == 1, country, NA)), size = 6) + 
  labs(x ='', y = '', title = 'Influential Outliers') + 
  bbplot::bbc_style() 

To look at the model-level data, we can use the tidy()function

fem_bus_tidy <- broom::tidy(fem_bus_lm)

And glance() to examine things such as the R-Squared value, the overall resudial standard deviation of the model (sigma) and the AIC scores.

broom::glance(fem_bus_lm)

An R squared of 0.55 is not that hot ~ so this model needs a fair bit more work.

We can also use the broom packge to graph out the assumptions of the linear model. First, we can check that the residuals are normally distributed!

fem_bus_pred %>% 
  ggplot(aes(x = .resid)) + 
  geom_histogram(bins = 15, fill = "#20948b") + 
  labs(x = '', y = '', title = 'Distribution of Residuals') +
  bbplot::bbc_style()

Next we can plot the predicted versus actual values from the model with and without the outliers.

First, all countries, like we did above:

fem_bus_pred %>%
  mutate(fh_category = cut(mean_fh, breaks =  5,
  labels = c("full demo ", "high", "middle", "low", "no demo"))) %>%         ggplot(aes(x = .fitted, y = mean_fem_bus)) + 
  geom_point(aes(color = fh_category), size = 4, alpha = 0.6) + 
  geom_smooth(method = "loess", alpha = 0.2, color = "#20948b") + 
  bbplot::bbc_style() + 
  labs(x = '', y = '', title = "Fitted values versus actual values")

And how to plot looks like if we drop the outliers that we spotted earlier,

fem_bus_pred %>%
  filter(country != "Eritrea") %>% 
   filter(country != "Belarus") %>% 
  mutate(fh_category = cut(mean_fh, breaks =  5,
                           labels = c("full demo ", "high", "middle", "low", "no demo"))) %>%         ggplot(aes(x = .fitted, y = mean_fem_bus)) + 
  geom_point(aes(color = fh_category), size = 4, alpha = 0.6) + 
  geom_smooth(method = "loess", alpha = 0.2, color = "#20948b") + 
  bbplot::bbc_style() + 
  labs(x = '', y = '', title = "Fitted values versus actual values")

Check model assumptions with easystats package in R

Packages we will need:

install.packages("easystats", repos = "https://easystats.r-universe.dev")
library(easystats)
easystats::install_suggested()

Easystats is a collection of R packages, which aims to provide a framework to tame the scary R statistics and their pesky models, according to their github repo.

Click here to browse the github and here to go to the specific perfomance package CRAN PDF

First run your regression. I will try to explain variance is Civil Society Organization participation (CSOs) with the independent variables in my model with Varieties of Democracy data in 1990.

cso_model <- lm(cso_part ~ education_level + mortality_rate + democracy,data = vdem_90)
Dependent variable:
cso_part
education_level-0.017**
(0.007)
mortality_rate-0.00001
(0.00004)
democracy0.913***
(0.064)
Constant0.288***
(0.054)
Observations134
R20.690
Adjusted R20.682
Residual Std. Error0.154 (df = 130)
F Statistic96.243*** (df = 3; 130)
Note:*p<0.1; **p<0.05; ***p<0.01
Excited Season 2 GIF by The Office - Find & Share on GIPHY

Then we check the assumptions:

performance::check_model(cso_model)

Comparing North and South Korean UN votes at the General Assembly with unvotes package

Packages we will use

Llibrary(unvotes)
library(lubridate)
library(tidyverse)
library(magrittr)
library(bbplot)
library(waffle)
library(stringr)
library(wordcloud)
library(waffle)
library(wesanderson)

Last September 17th 2021 marked the 30th anniversary of the entry of North Korea and South Korea into full membership in the United Nations. Prior to this, they were only afforded observer status.

keia.org

The Two Koreas Mark 30 Years of UN Membership: The Road to Membership

Let’s look at the types of voting that both countries have done in the General Assembly since 1991.

First we can download the different types of UN votes from the unvotes package

un_votes <- unvotes::un_roll_calls

un_votes_issues <- unvotes::un_roll_call_issues

unvotes::un_votes -> country_votes 

Join them all together and filter out any country that does not have the word “Korea” in its name.

un_votes %>% 
  inner_join(un_votes_issues, by = "rcid") %>% 
  inner_join(country_votes, by = "rcid") %>% 
  mutate(year = format(date, format = "%Y")) %>%
  filter(grepl("Korea", country)) -> korea_un

First we can make a wordcloud of all the different votes for which they voted YES. Is there a discernable difference in the types of votes that each country supported?

First, download the stop words that we can remove (such as the, and, if)

data("stop_words") 

Then I will make a North Korean dataframe of all the votes for which this country voted YES. I remove some of the messy formatting with the gsub argument and count the occurence of each word. I get rid of a few of the procedural words that are more related to the technical wording of the resolutions, rather than related to the tpoic of the vote.

nk_yes_votes <- korea_un %>% 
  filter(country == "North Korea") %>% 
  filter(vote == "yes") %>%  
  select(descr, year) %>% 
  mutate(decade = substr(year, 1, 3)) %>% 
  mutate(decade = paste0(decade, "0s")) %>% 
  # group_by(decade) %>% 
  unnest_tokens(word, descr) %>% 
  mutate(word = gsub(" ", "", word)) %>% 
  mutate(word = gsub('_', '', word)) %>% 
  count(word, sort = TRUE) %>% 
  ungroup() %>% 
  anti_join(stop_words)  %>% 
  mutate(word = case_when(grepl("palestin", word) ~ "Palestine", 
                          grepl("nucl", word) ~ "nuclear",
                          TRUE ~ as.character(word)))  %>%
  filter(word != "resolution") %>% 
  filter(word != "assembly") %>% 
  filter(word != "draft") %>% 
  filter(word != "committee") %>% 
  filter(word != "requested") %>% 
  filter(word != "report") %>% 
  filter(word != "practices") %>% 
  filter(word != "affecting") %>% 
  filter(word != "follow") %>% 
  filter(word != "acting") %>% 
  filter(word != "adopted") 

Next, we count the number of each word


nk_yes_votes %<>% 
  count(word) %>% 
  arrange(desc(n))

We want to also remove the numbers

nums <- nk_yes_votes %>% filter(str_detect(word, "^[0-9]")) %>% select(word) %>% unique()

And remove the stop words

nk_yes_votes %<>%
  anti_join(nums, by = "word")

Choose some nice colours

my_colors <- c("#0450b4", "#046dc8", "#1184a7","#15a2a2", "#6fb1a0", 
               "#b4418e", "#d94a8c", "#ea515f", "#fe7434", "#fea802")

And lastly, plot the wordcloud with the top 50 words

wordcloud(nk_yes_votes$word, 
   nk_yes_votes$n, 
   random.order = FALSE, 
   max.words = 50, 
   colors = my_colors)

If we repeat the above code with South Korea:

There doesn’t seem to be a huge difference. But this is not a very scientfic approach; I just like the look of them!

Next we will compare the two countries how many votes they voted yes, no or abstained from…

korea_un %>% 
  group_by(country, vote) %>% 
  count() %>% 
  mutate(count_ten = n /25) %>% 
  ungroup() %>% 
  ggplot(aes(fill = vote, values = count_ten)) +
  geom_waffle(color = "white",
              size = 2.5,
              n_rows = 10,
              flip = TRUE) +
  facet_wrap(~country) + bbplot::bbc_style() +
  scale_fill_manual(values = wesanderson::wes_palette("Darjeeling1"))

AND some tweaking with Canva

Next we can look more in detail at the votes that they countries abstained from voting in.

We can use the tidytext function that reorders the geom_bar in each country. You can read the blog of Julie Silge to learn more about the functions, it is a bit tricky but it fixes the problem of randomly ordered bars across facets.

https://juliasilge.com/blog/reorder-within/

korea_un %>%
  filter(vote == "abstain") %>% 
  mutate(issue = case_when(issue == "Nuclear weapons and nuclear material" ~ "Nukes",
issue == "Arms control and disarmament" ~ "Arms",
issue == "Palestinian conflict" ~ "Palestine",
TRUE ~ as.character(issue))) %>% 
  select(country, issue, year) %>% 
  group_by(issue, country) %>% 
  count() %>% 
  ungroup() %>% 
  group_by(country) %>% 
  mutate(country = as.factor(country),
         issue = reorder_within(issue, n, country)) %>%
  ggplot(aes(x = reorder(issue, n), y = n)) + 
  geom_bar(stat = "identity", width = 0.7, aes(fill = country)) + 
  labs(title = "Abstaining UN General Assembly Votes by issues",
       subtitle = ("Since 1950s"),
       caption = "         Source: unvotes ") +
  xlab("") + 
  ylab("") +
  facet_wrap(~country, scales = "free_y") +
  scale_x_reordered() +
  coord_flip() + 
  expand_limits(y = 65) + 
  ggthemes::theme_pander() + 
  scale_fill_manual(values = sample(my_colors)) + 
 theme(plot.background = element_rect(color = "#f5f9fc"),
        panel.grid = element_line(colour = "#f5f9fc"),
        # axis.title.x = element_blank(),
        # axis.text.x = element_blank(),
        axis.text.y = element_text(color = "#000500", size = 16),
       legend.position = "none",
        # axis.title.y = element_blank(),
        axis.ticks.x = element_blank(),
        text = element_text(family = "Gadugi"),
        plot.title = element_text(size = 28, color = "#000500"),
        plot.subtitle = element_text(size = 20, color = "#484e4c"),
        plot.caption = element_text(size = 20, color = "#484e4c"))

South Korea was far more likely to abstain from votes that North Korea on all issues

Next we can simply plot out the Human Rights votes that each country voted to support. Even though South Korea has far higher human rights scores, North Korea votes in support of more votes on this topic.

korea_un %>% 
  filter(year < 2019) %>% 
  filter(issue == "Human rights") %>% 
  filter(vote == "yes") %>% 
  group_by(country, year) %>% 
  count() %>% 
  ggplot(aes(x = year, y = n, group = country, color = country)) + 
  geom_line(size = 2) + 
  geom_point(aes(color = country), fill = "white", shape = 21, size = 3, stroke = 2.5) +
  scale_x_discrete(breaks = round(seq(min(korea_un$year), max(korea_un$year), by = 10),1)) +
  scale_y_continuous(expand = c(0, 0), limits = c(0, 22)) + 
  bbplot::bbc_style() + facet_wrap(~country) + 
  theme(legend.position = "none") + 
  scale_color_manual(values = sample(my_colors)) + 
  labs(title = "Human Rights UN General Assembly Yes Votes ",
       subtitle = ("Since 1990s"),
       caption = "         Source: unvotes ")

All together:

Building a dataset for political science analysis in R, PART 2

Packages we will need

library(tidyverse)
library(peacesciencer)
library(countrycode)
library(bbplot)

The main workhorse of this blog is the peacesciencer package by Stephen Miller!

The package will create both dyad datasets and state datasets with all sovereign countries.

Thank you Mr Miller!

There are heaps of options and variables to add.

Go to the page to read about them all in detail.

Here is a short list from the package description of all the key variables that can be quickly added:

We create the dyad dataset with the create_dyadyears() function. A dyad-year dataset focuses on information about the relationship between two countries (such as whether the two countries are at war, how much they trade together, whether they are geographically contiguous et cetera).

In the literature, the study of interstate conflict has adopted a heavy focus on dyads as a unit of analysis.

Alternatively, if we want just state-year data like in the previous blog post, we use the function create_stateyears()

We can add the variables with type D to the create_dyadyears() function and we can add the variables with type S to the create_stateyears() !

Focusing on the create_dyadyears() function, the arguments we can include are directed and mry.

The directed argument indicates whether we want directed or non-directed dyad relationship.

In a directed analysis, data include two observations (i.e. two rows) per dyad per year (such as one for USA – Russia and another row for Russia – USA), but in a nondirected analysis, we include only one observation (one row) per dyad per year.

The mry argument indicates whether they want to extend the data to the most recently concluded calendar year – i.e. 2020 – or not (i.e. until the data was last available).

dyad_df <- create_dyadyears(directed = FALSE, mry = TRUE) %>%
  add_atop_alliance() %>%  
  add_nmc() %>%
  add_cow_trade() %>% 
  add_creg_fractionalization() 

I added dyadic variables for the

You can follow these links to check out the codebooks if you want more information about descriptions about each variable and how the data were collected!

The code comes with the COW code but I like adding the actual names also!

dyad_df$country_1 <- countrycode(dyad_df$ccode1, "cown", "country.name")

With this dataframe, we can plot the CINC data of the top three superpowers, just looking at any variable that has a 1 at the end and only looking at the corresponding country_1!

According to our pals over at le Wikipedia, the Composite Index of National Capability (CINC) is a statistical measure of national power created by J. David Singer for the Correlates of War project in 1963. It uses an average of percentages of world totals in six different components (such as coal consumption, military expenditure and population). The components represent demographic, economic, and military strength

First, let’s choose some nice hex colors

pal <- c("China" = "#DE2910",
         "United States" = "#3C3B6E", 
         "Russia" = "#FFD900")

And then create the plot

dyad_df %>% 
 filter(country_1 == "Russia" | 
          country_1 == "United States" | 
          country_1 == "China") %>% 
  ggplot(aes(x = year, y = cinc1, group = as.factor(country_1))) +
  geom_line(aes(color = country_1)) +
  geom_line(aes(color = country_1), size = 2, alpha = 0.8) + 
  scale_color_manual(values =  pal) +
  bbplot::bbc_style()

In PART 3, we will merge together our data with our variables from PART 1, look at some descriptive statistics and run some panel data regression analysis with our different variables!

Check linear regression assumptions with the olsrr package in R

Packages we will need:

library(olsrr)
library(countrycode)
library(WDI)
library(stargazer)
library(peacesciencer)
library(plm)

One core assumption of linear regression analysis is that the residuals of the regression are normally distributed.

When the normality assumption is violated, interpretation and inferences may not be reliable. In worst case, the interpretations are not at all valid.

So it is important we check this assumption is not violated.

As well residuals being normal distributed, we must also check that the residuals have the same variance (i.e. homoskedasticity).

Click here to find out how to check for homoskedasticity.

Then, if there is a problem with the variance, click here to find out how to fix heteroskedasticity (which means the residuals have a non-random pattern in their variance) with the sandwich package in R.

There are three ways to check that the error in our linear regression has a normal distribution:

  • plots or graphs such histograms, boxplots or Q-Q-plots, to get a visual approximation
  • examining skewness and kurtosis indices
  • formal normality tests, to check for a p-value

In this blog, we will see what factors affect military spending by a government.

We will take some variables from the World Bank via the WDI package.

Click here to read more about downloading World Bank Data with the WDI package.

mil_spend_gdp = WDI(indicator = "MS.MIL.XPND.ZS")
gdp_percap = WDI(indicator = "NY.GDP.PCAP.KD")

mil_spend_gdp %>% 
  inner_join(gdp_percap) %>% 
  select(country, year,
         mil_spend_gdp = MS.MIL.XPND.ZS,
         gdp_percap = NY.GDP.PCAP.KD) %>%  
  mutate(cown = countrycode(country, "country.name", "cown")) %>% 
  filter(!is.na(cown)) -> wdi_data

And also download some variables via the peacesciencer package.

Click here to read more about the peacesciencer package in the blog posts about building datasets

peacesciencer::create_stateyears(system = "gw") %>% 
  add_ucdp_acd() %>% 
  add_democracy() %>% 
  mutate(cown = countrycode(statename, "country.name", "cown")) -> peace_data

We can code a new binary variable that indicates if there was a UCDP conflict in the previous 10 years or not.

We could imagine a country that experienced war is more likely to keep investing in their military (as a larger percentage of their GDP) than countries that have only experienced relative peace in their recent past.

peace_data %<>%
  select(statename, cown, year, ucdpongoing, maxintensity, conflict_ids, v2x_polyarchy, polity2) %>% 
  mutate(ucdpongoing_no_na = ifelse(is.na(ucdpongoing), 0, ucdpongoing)) %>% 
  group_by(statename) %>%
  arrange(year) %>%
  mutate(war_past_10_years = ifelse(ucdpongoing == 1 & lag(ucdpongoing, order_by = year, default = 0, n = 10) == 1, 1, 0)) %>% 
  mutate(war_past_10_years_no_na = ifelse(ucdpongoing_no_na == 1 & lag(ucdpongoing_no_na, order_by = year, default = 0, n = 10) == 1, 1, 0)) 

We merge the data by the Correlates of War codes.

Click here to read more about using COW codes with the countrycode package.

wdi_data %>% 
  inner_join(peace_data, by = c("cown", "year")) -> wdi_peace

With these data, we can build our linear regression model.

Our dependent variable is military spending as a percentage of GDP (logged)

Our independent varibles are:

  • GDP per capita (logged) from the World Bank
  • Demoracy (as measured by the V-DEM polyarchy score)
  • Binary variable that is 1 if a country had a UCDP conflict in the previous 10 years and 0 if none.

We will also add an interaction term with the GDP and democracy variable.

Given we have cross-sectional longitudinal data, the best option would be panel data analysis with the plm package

plm(log(mil_spend_gdp) ~ log(gdp_percap)*v2x_polyarchy + as.factor(war_past_10_years_no_na), data = wdi_peace, 
  index = c("cown", "year"), model = "within") %>% 
  stargazer(., type = "text")
Dependent variable:
Military spending (GDP %) (ln)
GDP pc (ln)-0.288***
(0.029)
Democracy1.004***
(0.353)
War 10 year dummy0.146***
(0.021)
GDP pc (ln) x Democracy-0.199***
(0.046)
Observations3,686
R20.135
Adjusted R20.097
F Statistic137.989*** (df = 4; 3530)
Note:*p<0.1; **p<0.05; ***p<0.01

However, the olsrr package cannot handle plm.

In future blog posts, we will lok more closely at plm() panel regressions and the diagnostic tests we have to run with these types of models.

So we will just look at one year, 2010.

lm(log(mil_spend_gdp) ~ log(gdp_percap)*v2x_polyarchy + as.factor(war_past_10_years_no_na), data = subset(wdi_peace, year == 2010)) -> war_model
Dependent variable:
Military spending (GDP %) (ln)
GDP pc (ln)0.261**
(0.101)
Democracy1.450
(1.565)
War 10 year dummy0.592***
(0.159)
GDP pc (ln) x Democracy-0.343**
(0.168)
Constant0.183
(0.885)
Observations136
R20.381
Adjusted R20.362
Residual Std. Error0.615 (df = 131)
F Statistic20.137*** (df = 4; 131)
Note:*p<0.1; **p<0.05; ***p<0.01

So now we have our OLS model, we can run a heap of linear model diagnostic functions with the olsrr package.

Built by Aravind Hebbali, the description of the package mentions that olsrr has tools designed to make it easier for users, particularly beginner/intermediate R users to build ordinary least squares regression models. Thank you Aravind!

It includes regression output, heteroskedasticity tests, collinearity diagnostics, residual diagnostics, measures of influence, model fit assessment and variable selection procedures. Look through the CRAN PDF below or look at rsquaredacademy website to get a comprehensive overview of the package

We will now check if the residuals in our model (the difference between what our model predicted and what the values actually are) are normally distributed

ols_test_normality(war_model)
Test Statistic p-value
Shapiro-Wilk 0.9817 0.0653
Kolmogorov-Smirnov 0.0524 0.8494
Cramer-von Mises 14.1123 0.0000
Anderson-Darling 0.469 0.2447

Let’s look at each test result in turn

Shapiro-Wilk:

The test statistic is 0.9817, and the p-value is 0.0653.

The null hypothesis is that the residuals are normally distributed.

In this case, the p-value is greater than the predefined significance level (typically 0.05), so you cannot reject the null hypothesis.

This suggests that the residuals may follow a normal distribution.

Woo!

Kolmogorov-Smirnov:

The test statistic is 0.0524, and the p-value is 0.8494.

Similar to the Shapiro-Wilk test, the p-value is greater than 0.05, so you cannot reject the null hypothesis of normality.

This suggests that the residuals may follow a normal distribution.

Yay.

Cramer-von Mises:

This test statistic is 14.1123, and the p-value is 0.0000.

The null hypothesis is that the residuals are normally distributed. The very low p-value indicates that you can reject the null hypothesis, suggesting that the residuals are not from a normal distribution.

Oh no.

Anderson-Darling: This is another test of normality. The test statistic is 0.469, and the p-value is 0.2447. Similar to the Shapiro-Wilk and Kolmogorov-Smirnov tests, the p-value is greater than 0.05, so you cannot reject the null hypothesis of normality.

Phew.

Which of the normality tests is the best?

And what is up with Cramer-von Mises?

A paper by Razali and Wah (2011) tested all these formal normality tests with 10,000 Monte Carlo simulation of sample data generated from alternative distributions that follow symmetric and asymmetric distributions.

Their results showed that the Shapiro-Wilk test is the most powerful normality test, followed by Anderson-Darling test, and Kolmogorov-Smirnov test. Their study did not look at the Cramer-Von Mises test.

The results of Razali and Wah’s study echo the previous findings of Mendes and Pala (2003) and Keskin (2006) in support of Shapiro-Wilk test as the most powerful normality test.

According Ahad and colleagues (2011: 641), they find that

“the performances of the normality tests, namely, the Kolmogorov-Smirnov test, Anderson-Darling test, Cramervon Mises test, and Shapiro-Wilk test, were evaluated under various spectrums of non-normal distributions and different sample sizes. The results showed that the ShapiroWilk test is the most sensitive normality test because this test rejects the null hypothesis of normality at the smallest sample sizes compared to the other tests, at all levels of skewness and kurtosis. Thus, when the four normality tests are available in a statistical package, we would recommend practitioners to use the Shapiro-Wilk normality to test the normality of data”

Ahad et al (2001: 641)

We can plot out the residuals distribution in a histogram with olsrr

olsrr::ols_plot_resid_hist(war_model)

Visually, we can confirm that the residuals have a lovely bell curve and are broadly normally distributed! With a few outliers at -2.

Nest we can check the residuals with a QQ plot.

A QQ plot is used to compare residuals to the normal distribution in linear regression. We can use a normal QQ plot to visually check if our residuals follow a theoretical normal distribution.

In addition to being good at identifying outliers and heavy tails, QQ plots can reveal characteristics such as skewness and bimodality, and can be effective even
for small samples (Marden, 2004).

olsrr::ols_plot_resid_qq(war_model)

Again we can see some outliers at -2

Next we can look at a scatter plot of residuals on the y axis and fitted values on the x axis to detect non-linearity, unequal error variances, and outliers.

Each point in the plot is a residual value (i.e. the difference between what the model predicted and what the value actually

When interpreting this plot, there are a few things we want to look out for.

  1. The points does not deviate too far from 0. This indicates the variance is homogeneous (i.e. homescediasticity, one of my favourite words)
  2. The points are random (i.e. show no distinct pattern) around the horizontal red line at 0
ols_plot_resid_fit(war_model)
  1. There are some residual values at the -2, so they might be outliers. We we look at an outlier diagnostic plot in a bit.
  2. There are no discernible pattern in the scatterplot, so there does not seem to be any heteroscedasticity in the variance.

We can run an ols_plot_resid_lev() to graph for detecting outliers and/or observations with high leverage.

ols_plot_resid_lev(war_model)

There are a few outliers with leverage that we need to look more closely and examine how they prove / challenge our given theory / hypotheses.

FINALLLY. for a more complete diagnostics check, we can insert the model into the ols_coll_diag() function to calculate the Variance Inflation Factor (VIF) and Eigenvalues of the variables in the model.

VIF scores highlight if there is multicollinearity between the independent variables. If they are too highly correlated, our model is in trouble.

  • If the value of VIF is 1< VIF < 5, it specifies that the variables are moderately correlated to each other.

  • The challenging value of VIF is between 5 to 10 as it specifies the highly correlated variables.

  • If VIF ≥ 5 to 10, there will be multicollinearity among the predictors in the regression model.

  • VIF > 10 indicate the regression coefficients are feebly estimated with the presence of multicollinearity

Read more about the issues with multicollinearity in Shrestha (2020)

ols_coll_diag(war_model) 
Variables Tolerance VIF
GDP per capita (ln) 0.13 7.6
Democracy 0.02 56.2
War 10 years 0.91 1.1
GDP pc (ln) X Democracy 0.01 79.9

Next we look at the Eigenvalues

Eigenvalue Condition Index intercept GDP pc (ln) Democracy War 10 years GDP pc (ln) X Democracy
3.93 1.00 0.00 0.00 0.00 0.01 0.00
0.90 2.09 0.00 0.00 0.00 0.82 0.00
0.16 5.01 0.01 0.00 0.00 0.12 0.01
0.02 15.14 0.04 0.08 0.05 0.02 0.02
0.00 67.74 0.95 0.92 0.94 0.03 0.97

This is not good.

But it is probably due to the interaction term.

If we run the regression agaon without any interaction term , the VIF scores are all around 1!

lm(log(mil_spend_gdp) ~ log(gdp_percap) + v2x_polyarchy + as.factor(war_past_10_years_no_na), data = subset(wdi_peace, year == 2010)) -> war_model_no_interaction
ols_coll_diag(war_model_no_interaction) 

There are plenty of other helpful functions in the olsrr package that we can look at with our model.

For example, we can run AIC stepwise regression to see if we need to drop any variables

aic_step <- ols_step_both_p(war_model)
Step Variable Added/Removed R-Square Adj. R-Square C(p) AIC RMSE
1 v2x_polyarchy addition 0.298 0.293 16.4970 271.6880 0.6474
2 as.factor(war_past_10_years_no_na) addition 0.347 0.338 8.0720 263.7888 0.6266
3 log(gdp_percap) addition 0.361 0.347 7.1600 262.8901 0.6223
4 log(gdp_percap):v2x_polyarchy addition 0.381 0.362 5.0000 260.6381 0.6150

Lower AIC scores are better, and AIC penalizes models that use more parameters.

That means if two models explain the same amount of variation, the model with a smaller number of variable parameters will have a lower AIC score.

Many would argue that this would be the better-fit model.

We can see in step 4, the AIC is the lowest. So that is good news!

Variables doe not live in a vacuum in the model. When we run a model, we want to have a better understanding of the relationship between military spending and the independent variables conditional on the other independent variables

According to the package, the added variable plot provides information about the marginal importance of a GIVEN independent variable, given the other variables already in the model.

It shows the marginal importance of the variable in reducing the residual variability.

olsrr::ols_plot_added_variable(war_model)

The military spending dependent variable is on the y axis and we look at adding the named variable (given that the other variables are already in the model).

The democracy variable GDP variable interaction slope appears to decrease while all other variables increase.

What do the Y and X residuals represent? The Y residuals represent the part of Y not explained by all the variables other than X. The X residuals represent the part of X not explained by other variables. The slope of the line fitted to the points in the added variable plot is equal to the regression coefficient when Y is regressed on all variables including X.

A strong linear relationship in the added variable plot indicates the increased importance of the contribution of X to the model already containing the other predictors.

We can see, for example, that (with all other variables held constant) higher GDP per capita correlates with higher proportion of military spending. Richer countries seem to dedicate more of this money to building a military.

Thank you for reading !

References

Ahad, N. A., Yin, T. S., Othman, A. R., & Yaacob, C. R. (2011). Sensitivity of normality tests to non-normal data. Sains Malaysiana40(6), 637-641.

Marden, J. I. (2004). Positions and QQ plots. Statistical Science, 606-614.

Razali, N. M., & Wah, Y. B. (2011). Power comparisons of Shapiro-Wilk, Kolmogorov-Smirnov, Lilliefors and Anderson-Darling tests. Journal of statistical modeling and analytics2(1), 21-33.

Shrestha, N. (2020). Detecting multicollinearity in regression analysis. American Journal of Applied Mathematics and Statistics8(2), 39-42.

Check for multicollinearity with the car package in R

Packages we will need:

install.packages("car")
library(car)

When one independent variable is highly correlated with another independent variable (or with a combination of independent variables), the marginal contribution of that independent variable is influenced by other predictor variables in the model.

And so, as a result:

  • Estimates for regression coefficients of the independent variables can be unreliable.
  • Tests of significance for regression coefficients can be misleading.

To check for multicollinearity problem in our model, we need the vif() function from the car package in R. VIF stands for variance inflation factor. It measures how much the variance of any one of the coefficients is inflated due to multicollinearity in the overall model.

As a rule of thumb, a vif score over 5 is a problem. A score over 10 should be remedied and you should consider dropping the problematic variable from the regression model or creating an index of all the closely related variables.

This blog post will look only at the VIF score. Click here to look at how to interpret various other multicollinearity tests in the mctest package in addition to the the VIF score.

Back to our model, I want to know whether countries with high levels of clientelism, high levels of vote buying and low democracy scores lead to executive embezzlement?

So I fit a simple linear regression model (and look at the output with the stargazer package)

summary(embezzlement_model_1 <- lm(executive_embezzlement ~ clientelism_index + vote_buying_score + democracy_score, data = data_2010))

stargazer(embezzlement_model_1, type = "text")

I suspect that clientelism and vote buying variables will be highly correlated. So let’s run a test of multicollinearity to see if there is any problems.

car::vif(embezzlement_model_1)

The VIF score for the three independent variables are :

Both clientelism index and vote buying variables are both very high and the best remedy is to remove one of them from the regression. Since vote buying is considered one aspect of clientelist regime so it is probably overlapping with some of the variance in the embezzlement score that the clientelism index is already explaining in the model

So re-run the regression without the vote buying variable.

summary(embezzlement_model_2 <- lm(v2exembez ~ v2xnp_client  + v2x_api, data = vdem2010))
stargazer(embezzlement_model_2, embezzlement_model_2, type = "text")
car::vif(embezzlement_mode2)

Comparing the two regressions:

And running a VIF test on the second model without the vote buying variable:

car::vif(embezzlement_model_2)

These scores are far below 5 so there is no longer any big problem of multicollinearity in the second model.

Click here to quickly add VIF scores to our regression output table in R with jtools package.

Plus, looking at the adjusted R2, which compares two models, we see that the difference is very small, so we did not lose much predictive power in dropping a variable. Rather we have minimised the issue of highly correlated independent variables and thus an inability to tease out the real relationships with our dependent variable of interest.

tl;dr: As a rule of thumb, a vif score over 5 is a problem. A score over 10 should be remedied (and you should consider dropping the problematic variable from the regression model or creating an index of all the closely related variables).

Click here to run stepwise regression analysis to help decide which problematic variables we can drop from our model (based on AIC scores)

Correct for heteroskedasticity in OLS with sandwich package in R

Packages we will need:

library(sandwich)
library(stargazer)
library(lmtest)

If our OLS model demonstrates high level of heteroskedasticity (i.e. when the error term of our model is not randomly distributed across observations and there is a discernible pattern in the error variance), we run into problems.

Why? Because this means OLS will use sub-optimal estimators based on incorrect assumptions and the standard errors computed using these flawed least square estimators are more likely to be under-valued.

Since standard errors are necessary to compute our t – statistic and arrive at our p – value, these inaccurate standard errors are a problem.

Click here to check for heteroskedasticity in your model with the lmtest package.

To correct for heteroskedastcity in your model, you need the sandwich package and the lmtest package to employ the vcocHC argument.

Gordon Ramsey Idiot GIF - Find & Share on GIPHY

First, let’s fit a simple OLS regression.

summary(free_express_model <- lm(freedom_expression ~ free_elections + deliberative_index, data = data_1990))

We can see that there is a small star beside the main dependent variable of interest! Success!

Happy So Excited GIF - Find & Share on GIPHY

We have significance.

Thus, we could say that the more free and fair the elections a country has, this increases the mean freedom of expression index score for that country.

This ties in with a very minimalist understanding of democracy. If a country has elections and the populace can voice their choice of leadership, this will help set the scene for a more open society.

However, it is naive to look only at the p – value of any given coefficient in a regression output. If we run some diagnostic analyses and look at the relationship graphically, we may need to re-examine this seemingly significant relationship.

Can we trust the 0.087 standard error score that our OLS regression calculated? Is it based on sound assumptions?

Worried Its Always Sunny In Philadelphia GIF by HULU - Find & Share on GIPHY

First let’s look at the residuals. Can we assume that the variance of error is equal across all observations?

If we examine the residuals (the first graph), we see that there is actually a tapered fan-like pattern in the error variance. As we move across the x axis, the variance along the y axis gets continually smaller and smaller.

The error does not look random.

Panicking Oh No GIF by HULU - Find & Share on GIPHY

Let’s run a Breush-Pagan test (from the lmtest package) to check our suspicion of heteroskedasticity.

lmtest::bptest(free_exp_model)

We can reject the null hypothesis that the error variance is homoskedastic.

So the model does suffer from heteroskedasticty. We cannot trust those stars in the regression output!

Season 1 Omg GIF by Friends - Find & Share on GIPHY

In order to fix this and make our p-values more accuarate, we need to install the sandwich package to feed in the vcovHC adjustment into the coeftest() function.

vcovHC stands for variance covariance Heteroskedasticity Consistent.

With the stargazer package (which prints out all the models in one table), we can compare the free_exp_model alone with no adjustment, then four different variations of the vcovHC adjustment using different formulae (as indicated in the type argument below).

stargazer(free_exp_model,
          coeftest(free_exp_model, vcovHC(free_exp_model, type = "HC0")),
          coeftest(free_exp_model, vcovHC(free_exp_model, type = "HC1")),
          coeftest(free_exp_model, vcovHC(free_exp_model, type = "HC2")),
          coeftest(free_exp_model, vcovHC(free_exp_model, type = "HC3")),
          type = "text")

Looking at the standard error in the (brackets) across the OLS and the coeftest models, we can see that the standard error are all almost double the standard error from the original OLS regression.

There is a tiny difference between the different types of Heteroskedastic Consistent (HC) types.

The significant p – value disappears from the free and fair election variable when we correct with the vcovHC correction.

Season 2 Friends GIF - Find & Share on GIPHY

The actual coefficient stays the same regardless of whether we use no correction or any one of the correction arguments.

Which HC estimator should I use in my vcovHC() function?

The default in the sandwich package is HC3.

STATA users will be familiar with HC1, as it is the default robust standard error correction when you add robust at the end of the regression command.

The difference between them is not very large.

The estimator HC0 was suggested in the econometrics literature by White in 1980 and is justified by asymptotic arguments.

For small sample sizes, the standard errors from HC0 are quite biased, usually downward, and this results in overly liberal inferences in regression models (Bera, Suprayitno & Premaratne, 2002). But with HC0, the bias shrinks as your sample size increases.

The estimator types HC1, HC2 and HC3 were put forward by MacKinnon and White (1985) to improve the performance in small samples.

Long and Ervin (2000) furthermore argue that HC3 provides the best performance in small samples as it gives less weight to influential observations in the model

In our freedom of expression regression, the HC3 estimate was the most conservative with the standard error calculations. however the difference between the approaches did not change the conclusion; ultimately the main independent variable of interest in this analysis – free and fair elections – can explain variance in the dependent variable – freedom of expression – does not find evidence in the model.

Click here to read an article by Hayes and Cai (2007) which discusses the matrix formulae and empirical differences between the different calculation approaches taken by the different types. Unfortunately it is all ancient Greek to me.

References

Bera, A. K., Suprayitno, T., & Premaratne, G. (2002). On some heteroskedasticity-robust estimators of variance–covariance matrix of the least-squares estimators. Journal of Statistical Planning and Inference108(1-2), 121-136.

Hayes, A. F., & Cai, L. (2007). Using heteroskedasticity-consistent standard error estimators in OLS regression: An introduction and software implementation. Behavior research methods39(4), 709-722.

Long, J. S., & Ervin, L. H. (2000). Using heteroscedasticity consistent standard errors in the linear regression model. The American Statistician54(3), 217-224.

MacKinnon, J. G., & White, H. (1985). Some heteroskedasticity-consistent covariance matrix estimators with improved finite sample properties. Journal of econometrics29(3), 305-325.